Structure and Classes
해당 글의 내용은 아래 문서를 번역한 글입니다.
Model custom types that encapsulate data.
데이터를 캡슐화하는 커스텀 타입을 모델링합니다.
Structures and classes are general-purpose, flexible constructs that become the building blocks of your program’s code. You define properties and methods to add functionality to your structures and classes using the same syntax you use to define constants, variables, and functions.
구조체와 클래스는 프로그램 코드의 코드블럭이 되는 범용적이고 유연한 구성체다. 상수, 변수, 함수를 정의하는 것과 동일한 문법을 사용하여 구조체와 클래스의 기능을 추가하는 프로퍼티와 메서드를 정의할 수 있다.
Unlike other programming languages, Swift doesn’t require you to create separate interface and implementation files for custom structures and classes. In Swift, you define a structure or class in a single file, and the external interface to that class or structure is automatically made available for other code to use.
다른 프로그래밍 언어와 달리, 스위프트는 커스텀 구조체나 클래스를 위한 별도의 인터페이스나 구현 파일을 생성할 필요가 없다. 스위프트에서는 하나의 파일에 구조체나 클래스를 정의하면, 해당 클래스나 구조체에 대한 외부 인터페이스는 다른 코드에서 사용할 수 있도록 자동으로 제공한다.
자바스크립트와 같은 언어와 달리 import 하지 않고도 사용이 가능한 것 같다. 단 기본적으로는 하나의 타겟일 경우에만 같은 코드가 공유되는 것 같다.
An instance of a class is traditionally known as an object. However, Swift structures and classes are much closer in functionality than in other languages, and much of this chapter describes functionality that applies to instances of either a class or a structure type. Because of this, the more general term instance is used.
클래스의 인스턴스는 전통적으로 오브젝트(객체)라 부른다. 그러나, 스위프트의 구조체나 클래스는 다른 언어에 비해 기능적으로 훨씬 가깝다. 이 장의 많은 부분은 클래스나 구조체 타입의 인스턴스에 적용되는 기능을 설명한다. 이 때문에 일반적인 용어로 인스턴스가 사용된다.
Comparing Structures and Classes
클래스와 구조체의 비교
Structures and classes in Swift have many things in common. Both can:
스위프트에서 구조체와 클래스는 일반적으로 많은 공통점이 있다. 둘 다 할 수 있다.
- Define properties to store values - Define methods to provide functionality - Define subscripts to provide access to their values using subscript syntax - Define initializers to set up their initial state
- Be extended to expand their functionality beyond a default implementation - Conform to protocols to provide standard functionality of a certain kind
- 값을 저장할 프로퍼티를 정의한다.
- 기능을 제공하는 메서드를 정의한다.
- 서브스크립트 구문을 사용해서 해당 값의 대한 접근을 제공하도록 서브스크립트를 정의한다.
- 초기화를 정의해서 초기 상태를 설정한다.
- 기본 구현체를 넘어 기능할 수 있도록 확장할 수 있다.
- 특정 종류의 표준 기능을 제공하기 위한 프로토콜을 따른다.
For more information, see
Properties, Methods, Subscripts, Initialization, Extensions, and Protocols.더 많은 정보는 다음 문서들(프로퍼티, 메서드, 서브스크립션, 생성자, 확장, 프로토콜)을 참조.
Classes have additional capabilities that structures don’t have:
클래스는 구조체가 갖고 있지 않는 추가 기능이 있다.
- Inheritance enables one class to inherit the characteristics of another. - Type casting enables you to check and interpret the type of a class instance at runtime. - Deinitializers enable an instance of a class to free up any resources it has assigned. - Reference counting allows more than one reference to a class instance.
- 상속(Inheritance) - 상속을 통해 다른 클래스의 특성을 한 클래스가 상속할 수 있다.
- 타입캐스팅(Type casting) - 타입 캐스팅을 사용하면 런타임에서 클래스 인스턴스의 타입을 해석할 확인하고 해석할 수 있다.
- 소멸자(Deinitializer) - 소멸자(Deinitializer)를 사용하면 클래스의 인스턴스가 할당한 모든 리소스를 해제할 수 있다.
- 레퍼런스 카운팅(Reference counting) - 레퍼런스 카운팅은 클래스 인스턴스에 대한 하나 이상의 참조를 허용한다.
For more information, see
Inheritance, Typecasting, Deinitialization, and Automaticreferencecounting.더 많은 정보는 다음 문서들(상속, 타입캐스팅, 소멸자, 자동 레퍼런스 카운팅(ARC))을 참조.
The additional capabilities that classes support come at the cost of increased complexity. As a general guideline, prefer structures because they’re easier to reason about, and use classes when they’re appropriate or necessary. In practice, this means most of the custom types you define will be structures and enumerations. For a more detailed comparison, see Choosing Between Structures and Classes.
클래스가 제공하는 추가 기능을 사용하면 복잡성이 증가할 수 있다. 일반적으로 추론하기 쉽게 때문에 구조체를 선호하며, 적절하거나 필요하다면 클래스를 사용해야 한다. 즉, 대부분의 커스텀 타입의 경우 구조체와 열거형일 수 있음을 의미한다. 자세한 부분은 클래스와 구조체 중 선택하기를 참조하자.
Classes and actors share many of the same characteristics and behaviors. For information about actors, see Concurrency.
클래스와 행위자(actors)는 많은 특성과 동작을 공유한다. 행위자에 대한 자세한 설명은 Concurrency를 참조하자.
Definition Syntax
구문 정의
Structures and classes have a similar definition syntax. You introduce structures with the struct
keyword and classes with the class keyword. Both place their entire definition within a pair of braces:
구조체와 클래스의 정의 구문은 비슷하다. 구조체는 struct라는 키워드로, 클래스는 class라는 키워드로 소개한다. 둘다 한 쌍의 중괄호 안에 전체 정의를 배치한다.
struct SomeStructure {
    // structure definition goes here
}
class SomeClass {
    // class definition goes here
}
Whenever you define a new structure or class, you define a new Swift type. Give types UpperCamelCase names (such as SomeStructure and SomeClass here) to match the capitalization of standard Swift types (such as String, Int, and Bool). Give properties and methods lowerCamelCase names (such as frameRate and incrementCount) to differentiate them from type names.
새 구조체와 클래스를 정의할 때는 새로운 스위프트 타입을 정의하는 것과 같다. UpperCamelCase를 활용해 SomeStructure, SomeClass처럼 표준 스위프트 타입(String, Int, Bool)과 같이 선언하면 된다. 프로퍼티와 메서드는 frameRate, incrementCount처럼 lowerCamelCase를 활용해 정의하여 타입명과 구분한다.
Here’s an example of a structure definition and a class definition:
여기에 구조체와 클래스에 대한 정의 예시가 있다.
struct Resolution {
    var width = 0
    var height = 0
}
class VideoMode {
    var resolution = Resolution()
    var interlaced = false
    var frameRate = 0.0
    var name: String?
}
The example above defines a new structure called Resolution,to describe a pixel-based display
resolution. This structure has two stored properties called width and height. Stored properties are
constants or variables that are bundled up and stored as part of the structure or class. These two
properties are inferred to be of type Int by setting them to an initial integer value of 0.
예제를 보면 픽셀 기반의 디스플레이 해상도를 설명하기 위해 Resoltion이라 불리는 새로운 구조체를 정의하고 있다. 이 구조체는 두 개의 width, height라 불리는 저장 프로퍼티가 있다. 저장 프로퍼티들은 구조체나 클래스의 일부로 묶여 저장되는 상수 혹은 변수다. 두 프로퍼티들은 초기화 된 값 0으로 설정되어 있으므로 정수타입으로 추론된다.
The example above also defines a new class called VideoMode, to describe a specific video mode for video
display. This class has four variable stored properties. The first, resolution, is initialized with a
new Resolution structure instance, which infers a property type of Resolution. For the other three
properties, new VideoMode instances will be initialized with an interlaced setting of false (meaning
“noninterlaced video”), a playback frame rate of 0.0, and an optional String value called name.
The name property is automatically given a default value of nil, or “no name value”, because it’s of
an optional type.
또한 예시를 보면 비디오를 표시하기 위한 특정 비디오 모드를 설명하기 위해 VideoMode라 불리는 새로운 클래스가 정의되어 있다. 이 클래스는 네 가지 변수로 선언된 저장 프로퍼티를 갖고 있다. 첫번째로 resolution, 이것은 Resolution 타입으로 추론되는 새로운 Resoultion 구조체 인스턴스로 초기화 되었다. 다른 세 프로퍼티는 새로운 VideoMode 인스턴스가 생성될 때 설정된 값으로 초기화된다. 이 중 name 프로퍼티는 옵셔널 타입이므로 자동으로 기본 값이 nil 혹은 “값 없음”이 지정될 수 있다.
Structure and Class Instances
구조체와 클래스 인스턴스
The Resolution structure definition and the VideoMode class definition only describe what
a Resolution or VideoMode will look like. They themselves don’t describe a specific resolution or
video mode. To do that, you need to create an instance of the structure or class.
Resolution 구조체 정의와 VideoMode 클래스 정의는 해당 객체들이 어떻게 생겼는지만 설명한다. 그들은 특정한 해상도나 비디오 모드를 설명하지 않는다. 그렇게 하려면 구조체나 클래스의 인스턴스를 생성해야 한다.
The syntax for creating instances is very similar for both structures and classes:
구조체와 클래스 인스턴스를 생성하는 구문은 매우 유사하다.
let someResolution = Resolution()
let someVideoMode = VideoMode()
Structures and classes both use initializer syntax for new instances. The simplest form of initializer
syntax uses the type name of the class or structure followed by empty parentheses, such
as Resolution() or VideoMode(). This creates a new instance of the class or structure, with any
properties initialized to their default values. Class and structure initialization is described in more
detail in
Initialization
구조체와 클래스 둘다 초기화 구문을 사용해서 새로운 인스턴스를 생성한다. 초기화 구문의 가장 간단한 형태는 클래스나 구조체의 Resolution()이나 VideoMode()처럼 이름 뒤에 빈 괄호를 사용하는 것이다. 이렇게 하면 모든 속성이 기본값으로 초기화 된 클래스나 구조체의 새로운 인스턴스를 생성한다. 클래스나 구조체 초기화는 초기화에 자세히 설명되어 있다.
Accessing Properties
프로퍼티 접근하기
You can access the properties of an instance using dot syntax. In dot syntax, you write the property
name immediately after the instance name, separated by a period (.), without any spaces:
. 구문을 사용해서 인스턴스의 프로퍼티에 접근할 수 있다. 인스턴스 이름 바로 뒤에 공백 없이 마침표로 구분하여 속성 이름을 작성하여 사용한다.
print("The width of someResolution is \(someResolution.width)")
// Prints "The width of someResolution is 0"
In this example, someResolution.width refers to the width property of someResolution, and returns
its default initial value of 0.
위 예시에서 someResolution.width는 someResolution의 width 프로퍼티를 참조하고 기본 초기값인 0을 반환한다.
You can drill down into subproperties, such as the width property in the resolution property of
a VideoMode:
VideoMode의 Resoltion 프로퍼티 안의 width 프로퍼티 같은 하위 속성(sub property)까지도 파고 들어갈 수도 있다.
print("The width of someVideoMode is \(someVideoMode.resolution.width)")
// Prints "The width of someVideoMode is 0"
You can also use dot syntax to assign a new value to a variable property:
. 구문을 사용해 변수 속성의 새로운 값을 할당할 수도 있다.
someVideoMode.resolution.width = 1280
print("The width of someVideoMode is now \(someVideoMode.resolution.width)")
// Prints "The width of someVideoMode is now 1280"
Memberwise Initializers for Structure Types
구조체 타입의 멤버별 초기화
All structures have an automatically generated memberwise initializer, which you can use to initialize the member properties of new structure instances. nitial values for the properties of the new instance can be passed to the memberwise initializer by name:
모든 구조체는 자동으로 멤버별 초기화 생성자(generated memberwise initializer)가 생성된다. 이를 사용해 새로운 구조체 인스턴트의 멤버 프로퍼티를 초기화 할 수 있다. 새로운 인스턴스의 초기값은 프로퍼티 이름을 통해 멤버별 초기화 생성자에 전달될 수 있다.
let vga = Resolution(width: 640, height: 480)
Unlike structures, class instances don’t receive a default memberwise initializer. Initializers are described in more detail in
Initialization
구조체와 달리 클래스 인스턴스는 이러한 기본 멤버별 초기화를 받지 않는다. 초기화에 대한 더 자세한 설명은 초기화를 참조하자.
Structures and Enumerations Are Value Types
구조체와 열거형은 값 타입이다.
A value type is a type whose value is copied when it’s assigned to a variable or constant, or when it’s passed to a function.
값 타입은 변수나 상수로 지정되거나 함수로 전달되었을 때 값이 복사되는 타입이다.
You’ve actually been using value types extensively throughout the previous chapters. In fact, all of the basic types in Swift — integers, floating-point numbers, Booleans, strings, arrays and dictionaries — are value types, and are implemented as structures behind the scenes.
실제로 이전 장에서 값 타입을 광범위하게 사용했다. 스위프트에 모든 기본적인 타입(정수, 소수, 불, 문자열, 배열과 딕셔너리)들은 모두 값 타입이다. 그리고 이는 뒷 단에서 구조체로 구현되어 있다.
All structures and enumerations are value types in Swift. This means that any structure and enumeration instances you create — and any value types they have as properties — are always copied when they’re passed around in your code.
스위프트에서 모든 구조체나 열거형은 값 타입이다. 즉 생성한 모든 구조체 및 열거형 인스턴스와 값 타입으로 포함된 프로퍼티들은 코드에서 전달될 때 항상 복사된다는 것을 의미한다.
Collections defined by the standard library like arrays, dictionaries, and strings use an optimization to reduce the performance cost of copying. Instead of making a copy immediately, these collections share the memory where the elements are stored between the original instance and any copies. If one of the copies of the collection is modified, the elements are copied just before the modification. The behavior you see in your code is always as if a copy took place immediately.
배열, 딕셔너리, 문자열과 같이 표준 라이브러리에 의해 정의된 컬렉션 복사에 대한 성능 비용을 줄이기 위한 최적화를 사용한다. 즉시 복사본을 만드는 대신에, 이러한 컬렉션들은 원본 인스턴스와 모든 복사본 간에 요소가 저장된 메모리를 공유한다. 컬렉션의 복사본 중 하나가 수정되면 그 요소는 수정되기 전 복사된다. 코드에서 볼 수 있는 동작은 항상 복사가 즉시 발생한 것과 같다.
Copy-on-Write(COW)를 설명하고 있다. 재밌게도 타입에 따라 메모리를 점유하는 동작이 달라질 수 있다 (String과 Array) String 타입은 최적화 기법을 사용하여, 값 타입임에도 불구하고 스택 뿐 아니라 힙 영역의 메모리를 사용하기도 한다.[1]
실습 내용
String의 주소값을 살펴보면, 글자 수가 짧을 때와 길 때 복사될 때의 사용되는 메모리 방식이 다름을 알 수 있다.

import Foundation
import UIKit
import SwiftUI

func address(of object: UnsafeRawPointer) -> String{
    let address = Int(bitPattern: object)
    return String(format: "%p", address)
}

var myString: String = "Hello"
var myString2 = myString

var myLongString: String = "abcdefghijklmnopqrstuvwxyzABCDEFGHIJKLMNOPQRSTUVWXYZ"
var myLongString2 = myLongString

var myArray = [1, 2, 3]
var myArray2 = myArray

var mySet: Set = [1, 2, 2]
var mySet2: Set = mySet

var myInt = 1
var myInt2 = myInt
print(MemoryLayout<String>.size) // String 구조체의 메모리 값은 16이다.

address(of: myString)
address(of: myString2)
print(MemoryLayout.size(ofValue: myString))
print(MemoryLayout.size(ofValue: myString2))
address(of: myLongString)
address(of: myLongString2)
myLongString = "abcdefghijklmnopqrstuvwxyzABCDEFGHIJKLMNOPQRSTUVWXYZ2"
myLongString2 = "abcdefghijklmnopqrstuvwxyzABCDEFGHIJKLMNOPQRSTUV"
address(of: myLongString)
address(of: myLongString2)
print(MemoryLayout.size(ofValue: myLongString))
print(MemoryLayout.size(ofValue: myLongString2))
myString = "World"
address(of: myString)
address(of: myString2)
address(of: myString)
address(of: myString2)

address(of: myArray)
address(of: myArray2)

myArray[2] = 10
address(of: myArray)
address(of: myArray2)

address(of: &mySet)
address(of: &mySet2)

address(of: &myInt)
address(of: &myInt2)

myInt + 1
address(of: &myInt)

myInt = 10
address(of: &myInt)

myInt = myInt2
myInt2 = myInt

myArray2[1] = 2

address(of: myArray)
address(of: myArray2)

mySet.insert(2)
mySet.insert(3)

address(of: &mySet)
address(of: &mySet2)
Consider this example, which uses the Resolution structure from the previous example:
이전의 Resolution 구조체를 사용하는 다음 예제를 고려해보자.
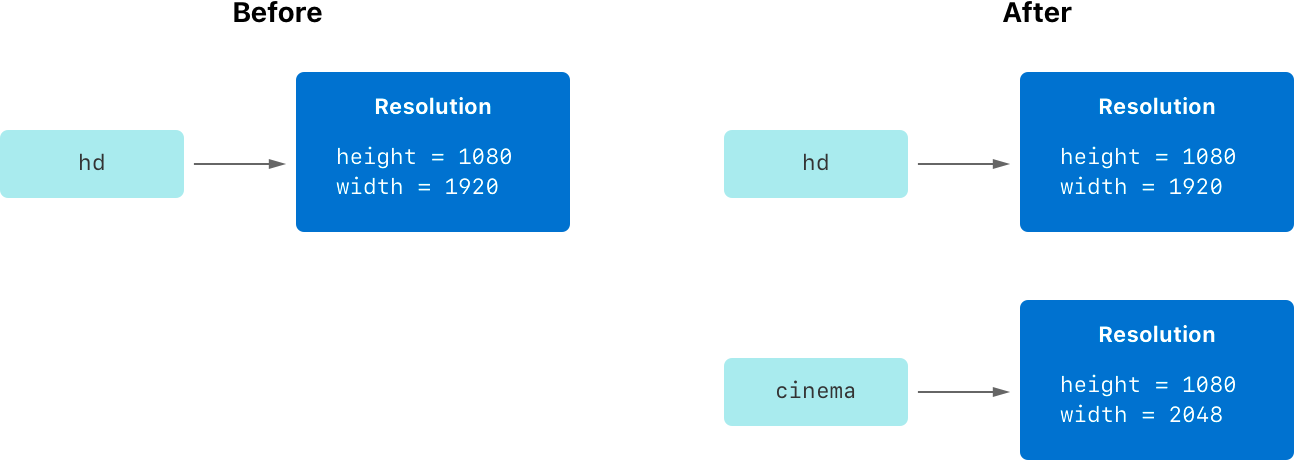
let hd = Resolution(width: 1920, height: 1080)
var cinema = hd
This example declares a constant called hd and sets it to a Resolution instance initialized with the
width and height of full HD video (1920 pixels wide by 1080 pixels high).
이 예제는 FHD video 사이즈로 초기화된 Resolution 인스턴스가 설정된 hd라 불리는 상수가 선언되어 있다.
It then declares a variable called cinema and sets it to the current value of hd.
Because Resolution is a structure, a copy of the existing instance is made, and this new copy is
assigned to cinema. Even though hd and cinema now have the same width and height, they’re two
completely different instances behind the scenes.
그런 다음 hd를 현재값으로 하는 cinema 불리는 변수를 선언하였다. Resolution은 구조체이기 때문에, 기존 인스턴스의 복제본이 만들어지고, 새 복사본이 할당된다. hd와 cinema가 현재 같은 width와 height를 갖고 있지만 그것들은 뒷 단에서는 완전히 다른 인스턴스다.
Next, the width property of cinema is amended to be the width of the slightly wider 2K standard used
for digital cinema projection (2048 pixels wide and 1080 pixels high):
다음으로, cinema의 width 프로퍼티를 디지털 영화 프로젝션에 사용하는 약간 더 넓은 2K 표준 너비로 수정해보자.
cinema.width = 2048
Checking the width property of cinema shows that it has indeed changed to be 2048:
cinema의 width 프로퍼티를 확인해보면, 2048로 실제로 바뀐 것을 확인할 수 있다.
print("cinema is now \(cinema.width) pixels wide")
// Prints "cinema is now 2048 pixels wide"
However, the width property of the original hd instance still has the old value of 1920:
그러나, 원본 hd 인스턴스의 width 프로퍼티는 여전히 이전 값인 1920을 갖고 있다.
print("hd is still \(hd.width) pixels wide")
// Prints "hd is still 1920 pixels wide"
When cinema was given the current value of hd, the values stored in hd were copied into the
new cinema instance. The end result was two completely separate instances that contained the same
numeric values. However, because they’re separate instances, setting the width
of cinema to 2048 doesn’t affect the width stored in hd, as shown in the figure below:
cinema의 현재 값이 hd로 주어졌을 때, hd의 저장된 값이 새로운 cinema 인스턴스에 복사되었다. 최종 결과는 동일한 숫자 값을 포함하는 완전히 별개의 두 인스턴스였다. 그러나, 별개의 인스턴스이기 때문에, cinemad의 width를 2048로 변경해도 아래 그림과 같이 hd에 저장된 것에는 영향을 미치지 않는다.
The same behavior applies to enumerations:
열거형에도 같은 동작이 적용된다.
enum CompassPoint {
    case north, south, east, west
    mutating func turnNorth() {
        self = .north
    }
}
var currentDirection = CompassPoint.west
let rememberedDirection = currentDirection
currentDirection.turnNorth()

print("The current direction is \(currentDirection)")
print("The remembered direction is \(rememberedDirection)")
// Prints "The current direction is north"
// Prints "The remembered direction is west"
When rememberedDirection is assigned the value of currentDirection, it’s actually set to a copy of
that value. Changing the value of currentDirection thereafter doesn’t affect the copy of the original
value that was stored in rememberedDirection.
rememberdDirection에 currentDirection의 값이 할당되었을 때, 그 값은 복사된 값이다. 이후에 currentDirection의 값을 바꾸어도 영향을 rememberdDirection에 저장된 원래 값의 복사본에는 미치지 않는다.
Classes Are Reference Types
클래스는 레퍼런스 타입이다.
Unlike value types, reference types are not copied when they’re assigned to a variable or constant, or when they’re passed to a function. Rather than a copy, a reference to the same existing instance is used.
값 타입과 달리, 레퍼런스 타입은 변수나 상수, 함수에 할당되거나, 함수로 전달되었을 때 복사되지 않는다. 복사되지 않고 동일한 기존 인스턴스를 참조한다.
Here’s an example, using the VideoMode class defined above:
여기에 위에서 정의된 VideoMode 클래스를 사용하는 예시가 있다.
let tenEighty = VideoMode()
tenEighty.resolution = hd
tenEighty.interlaced = true
tenEighty.name = "1080i"
tenEighty.frameRate = 25.0
This example declares a new constant called tenEighty and sets it to refer to a new instance of
the VideoMode class. The video mode is assigned a copy of the HD resolution of 1920 by 1080 from
before. It’s set to be interlaced, its name is set to "1080i", and its frame rate is set
to 25.0 frames per second.
이 예제는 VideoMode 클래스의 새 인스턴스를 참조하도록 설정하는 tenEighty라 불리는 새로운 상수를 선언한다. 비디오 모드는 이전의 1920x1080 HD 해상도의 사본을 할당하였고, interlaced와 1080i로 설정한 이름과, 25.0의 fps를 설정한 frameRate를 설정하였다.
Next, tenEighty is assigned to a new constant, called alsoTenEighty, and the frame rate
of alsoTenEighty is modified:
다음으로, alsoTenEighty라 불리는 상수에 tenEighty를 할당하고, frameRate를 수정했다.
let alsoTenEighty = tenEighty
alsoTenEighty.frameRate = 30.0
Because classes are reference types, tenEighty and alsoTenEighty actually both refer to
the same VideoMode instance. Effectively, they’re just two different names for the same single
instance, as shown in the figure below:
클래스는 레퍼런스 타입이기 때문에, tenEighty와 alsoTenEighty는 둘다 같은 VideMode 인스턴스를 참조한다. 실제로는 아래에서 보여지는 것처럼 같은 단지 이름이 다른 단일 인스턴스이다.
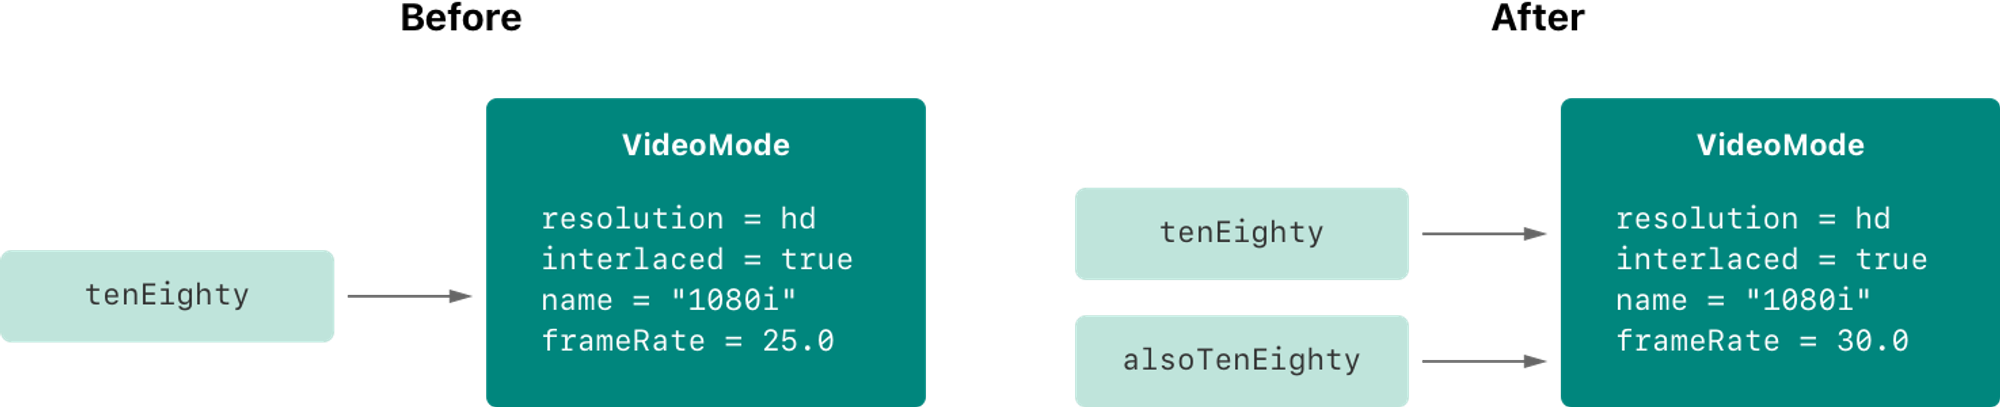
Checking the frameRate property of tenEighty shows that it correctly reports the new frame rate
of 30.0 from the underlying VideoMode instance:
tenEighty의 프로퍼티인 frameRate를 확인해보면, 기본 videoMode 인스턴스에 새 frameRate인 30이 적용된 것을 볼 수 있다.
print("The frameRate property of tenEighty is now \(tenEighty.frameRate)")
// Prints "The frameRate property of tenEighty is now 30.0"
This example also shows how reference types can be harder to reason about.
If tenEighty and alsoTenEighty were far apart in your program’s code, it could be difficult to find
all the ways that the video mode is changed. Wherever you use tenEighty, you also have to think about
the code that uses alsoTenEighty, and vice versa. In contrast, value types are easier to reason about
because all of the code that interacts with the same value is close together in your source files.
이 예제를 보면 참조 타입은 추론하기 더 어려움을 보여준다. tenEighty가 alsoTenEighty 프로그램 코드에서 더 멀리 떨어져 있다면, 비디오모드가 변경되는 모든 방법을 찾기 어려울 수 있다. 어디에서 tenEighty를 사용하든 또한 alsoTenEighty를 사용하는 코드에 대해서 생각해야하며, 그 반대 경우도 마찬가지다. 반대로 값 타입은 상호작용하는 모든 코드가 같은 소스 파일에서 서로 가깝기 때문에 쉽게 추론할 수 있다.
Note that tenEighty and alsoTenEighty are declared as constants, rather than variables. However, you
can still change tenEighty.frameRate and alsoTenEighty.frameRate because the values of
the tenEighty and alsoTenEighty constants themselves don’t actually change.
tenEighty and alsoTenEighty themselves don’t “store” the VideoMode instance — instead, they
both refer to a VideoMode instance behind the scenes. It’s the frameRate property of the
underlying VideoMode that’s changed, not the values of the constant references to that VideoMode.
tenEighty와 alsoTenEighty 모두 변수가 아닌 상수로 선언되었다. 그러나 여전히 tenEighty.frameRate나 alsoTenEighty.fraemRate 실제 상수값을 변경하지 않으므로 둘다 변경할 수 있다. 그것들은 모두 VideoMode 인스턴스를 저장하지 않으며, 뒷 단에서 둘다 VideoMode 인스턴스를 참조하기 때문이다. VideoMode 상수가 변경된게 아니고 VideoMode에 있는 frameRate 프로퍼티가 변경된 것이다.
Identity Operators
식별 연산자
Because classes are reference types, it’s possible for multiple constants and variables to refer to the same single instance of a class behind the scenes. (The same isn’t true for structures and enumerations, because they’re always copied when they’re assigned to a constant or variable, or passed to a function.)
클래스는 레퍼런스 타입이기 때문에, 다양한 상수와 변수가 뒷 단에서 같은 단일 인스턴스를 참조할 수 있다. (구조체와 열거형은 상수나 변수에 할당되거나 함수로 전달될 때 복사되기 때문에 식별 연산자가 필요없다.)
It can sometimes be useful to find out whether two constants or variables refer to exactly the same instance of a class. To enable this, Swift provides two identity operators:
두 개의 상수 혹은 변수가 정말로 동일한 클래스의 인스턴스를 참조하는지 확인할 수 있기 때문에 유용할 수 있다. 이를 위해 Swift는 두 가지 식별 연산자를 제공한다.
- Identical to (
===) - Not identical to (
!==)
- 동일함
- 동일하지 않음
Use these operators to check whether two constants or variables refer to the same single instance:
다음 연산자를 사용해서 두 상수 혹은 변수가 같은 단일 인스턴스를 참조하는지 확인할 수 있다.
if tenEighty === alsoTenEighty {
    print("tenEighty and alsoTenEighty refer to the same VideoMode instance.")
}
// Prints "tenEighty and alsoTenEighty refer to the same VideoMode instance."
Note that identical to (represented by three equals signs, or ===) doesn’t mean the same thing
as equal to (represented by two equals signs, or ==). Identical to means that two constants or
variables of class type refer to exactly the same class instance. Equal to means that two instances are
considered equal or equivalent in value, for some appropriate meaning of equal, as defined by the type’s
designer.
위에서 identical to(===) 는 equal to(==)와 의미가 같지 않다. identical to는 두 상수 혹은 변수가 동일한 클래스의 인스턴스를 참조하는가를 의미한다. equal to는 두 인스턴스의 값이 같거나 동등함을 의미한다.
When you define your own custom structures and classes, it’s your responsibility to decide what qualifies
as two instances being equal. The process of defining your own implementations of
the == and != operators is described in Equivalence Operators
커스텀 구조체나 클래스를 정의할 때, 두 인스턴스가 동일한 것으로 간주되는 항목을 결정하는 것은 사용자의 책임이다. ==와 ≠ 연산자를 정의하는 과정은 비교 연산자에 설명되어 있다.
스위프트에서 비교연산은 동일한 타입끼리 가능하다
구조체와 클래스의 비교 연산자는 사용자가 구현해야 한다.(지 멋대로 비교 가능)
실습 내용
struct Resolution {
    var width = 0
    var height = 0
    var depths = 0

    	// == 연산 구현 - 실제 동일하지 않더라도 동일한 것처럼 할 수 있다
    static func == (left: Resolution, right: Resolution) -> Bool {
        return (left.width == right.width) && (left.height == right.height)
     }

}

class VideoMode {
var resolution = Resolution()
var interlaced = false
var frameRate = 0.0
var myName = "Hello"
var name: String?

    static func == (left: VideoMode, right: VideoMode) -> Bool {
        return (left.myName == right.name) && (left.name == right.name)
     }

}

var myResolution = Resolution()
var myResolution2 = myResolution

var myVideoMode = VideoMode()
var myVideoMode2 = myVideoMode

myVideoMode === myVideoMode2 // true

myResolution == myResolution2 // true
myVideoMode == myVideoMode2 // false
Pointers
포인터
If you have experience with C, C++, or Objective-C, you may know that these languages use pointers to
refer to addresses in memory. A Swift constant or variable that refers to an instance of some reference
type is similar to a pointer in C, but isn’t a direct pointer to an address in memory, and doesn’t require
you to write an asterisk (*) to indicate that you are creating a reference. Instead, these references
are defined like any other constant or variable in Swift. The standard library provides pointer and buffer
types that you can use if you need to interact with pointers directly — see Manual Memory Management
C, C++, Objective-C에 대한 경험이 있는 경우 이러한 언어들이 포인터를 사용해서 메모리의 주소를 참조한다는 것을 알 수 있다. 일부 레퍼런스 타입의 인스턴스를 참조하는 스위프트의 상수나 변수는 C의 포인터와 유사하지만 메모리 주소에 대한 직접 포인터가 아니며 생성하는데 *를 사용하지 않아도 된다. 대신에, 이러한 레퍼런스는 스위프트의 변수나 상수처럼 선언이 가능하다. 표준 라이브러리는 포인터와 직접 상호 작용해야 하는 경우 사용할 수 있는 포인터와 버퍼 타입을 제공한다. - 수동 메모리 관리를 참조하자.
[1] 관련자료