Properties
해당 글의 내용은 아래 문서를 번역한 글입니다.
Properties associate values with a particular class, structure, or enumeration. Stored properties store constant and variable values as part of an instance, whereas computed properties calculate (rather than store) a value. Computed properties are provided by classes, structures, and enumerations. Stored properties are provided only by classes and structures.
프로퍼티는 값을 특정한 클래스나, 구조체, 열거형과 연결한다. 저장 프로퍼티(Stored properties)는 상수 및 변수 값을 인스턴스의 일부로 저장하는 반면 계산 프로퍼티(computed properties)는 값을 저장하는 대신 계산한다. 계산 프로퍼티는 구조체나 클래스, 열거형에 의해 제공된다. 저장 프로퍼티는 오직 클래스와 구조체로만 제공한다.
Stored and computed properties are usually associated with instances of a particular type. However, properties can also be associated with the type itself. Such properties are known as type properties.
저장 프로퍼티 혹은 계산 프로퍼티는 일반적으로 특정 타입의 인스턴스와 연결된다. 그러나, 프로퍼티는 타입 자체와도 연결될 수 있다. 이러한 프로퍼티를 타입 프로퍼티라 한다.
In addition, you can define property observers to monitor changes in a property’s value, which you can respond to with custom actions. Property observers can be added to stored properties you define yourself, and also to properties that a subclass inherits from its superclass.
추가적으로, 프로퍼티 관찰자(property observers)를 정의하여 프로퍼티의 값이 변경되는 것을 모니터링하고 커스텀 액션에 응답할 수 있다. 프로퍼티 관찰자는 직접 정의한 저장 프로퍼티와 슈퍼클래스로부터 상속된 서브클래스의 프로퍼티에서 추가될 수 있다.
You can also use a property wrapper to reuse code in the getter and setter of multiple properties.
또한 프로퍼티 래퍼(property wrapper)를 사용하여 여러 프로퍼티의 게터(getter)와 세터(setter)에서 코드를 재사용할 수 있다.
Stored Properties
저장 프로퍼티
In its simplest form, a stored property is a constant or variable that’s stored as part of an instance of
a particular class or structure. Stored properties can be either variable stored properties (introduced
by the var keyword) or constant stored properties (introduced by the let keyword).
가장 간단한 표현으로, 저장 프로퍼티는 특정 클래스 혹은 구조체의 인스턴스의 부분으로 저장된 상수 또는 변수다. 저장 프로퍼티는 저장된 프로퍼티 변수(variable stored properties) - (var 키워드로 사용됨) 또는 저장된 프로퍼티 상수(constatnt stored properties) - (let 키워드로 사용됨)로 사용될 수 있다.
You can provide a default value for a stored property as part of its definition, as described in Default Property Values. You can also set and modify the initial value for a stored property during initialization. This is true even for constant stored properties, as described in Assigning Constant Properties During Initialization.
기본 프로퍼티 값(Default Property Values)에서 설명한 것처럼, 정의의 일부로 저장 프로퍼티에 대한 기본값을 제공할 수 있다. 또한 초기화 중 저장 프로퍼티의 초기값을 설정하고 수정할 수 있다. 이는 초기화 중 프로퍼티 상수 할당(Assigning Constant Properties During Initalization)에서 설명한 것처럼, 저장 프로퍼티 상수에서도 마찬가지다.
The example below defines a structure called FixedLengthRange, which describes a range of integers whose
range length can’t be changed after it’s created:
아래 예제는 정의된 FixedLengthRage라 불리는 구조체를 정의한다. 이는 범위 길이가 생성된 후에 변경할 수 없는 정수 범위를 설명한다.
struct FixedLengthRange {
    var firstValue: Int
    let length: Int
}
var rangeOfThreeItems = FixedLengthRange(firstValue: 0, length: 3)
// the range represents integer values 0, 1, and 2
rangeOfThreeItems.firstValue = 6
// the range now represents integer values 6, 7, and 8
Instances of FixedLengthRange have a variable stored property called firstValue and a constant stored
property called length. In the example above, length is initialized when the new range is created and
can’t be changed thereafter, because it’s a constant property.
FixedLengthRage의 인스턴스는 firstValue나 불리는 저장 프로퍼티 변수와 length라 불리는 저장 프로퍼티 상수를 갖고 있다. 위의 예제에서, length는 새 범위가 생성되었을 때 초기화되고 상수 프로퍼티이기 때문에 이후에는 변경할 수 없다.
...
// 변수 구조체 인스턴스의 상수 프로퍼티를 변경하려 하면 에러가 발생한다.
rangeOfThreeItems.length = 10 // Properties.xcplaygroundpage:5:5: note: change 'let' to 'var' to make it mutable
Stored Properties of Constant Structure Instances
상수 구조체 인스턴스의 저장 프로퍼티
If you create an instance of a structure and assign that instance to a constant, you can’t modify the instance’s properties, even if they were declared as variable properties:
구조체의 인스턴스를 생성하고 상수로 할당하면, 변수 프로퍼티로 선언되었더라도 인스턴스의 프로퍼티를 변경할 수 없다.
let rangeOfFourItems = FixedLengthRange(firstValue: 0, length: 4)
// this range represents integer values 0, 1, 2, and 3
rangeOfFourItems.firstValue = 6
// this will report an error, even though firstValue is a variable property
Because rangeOfFourItems is declared as a constant (with the let keyword), it isn’t possible to change
its firstValue property, even though firstValue is a variable property.
왜냐하면 rangeOfFourItems는 (let 키워드와 함께) 상수로 선언되었기 때문에 비록 firstValue가 변수 프로퍼티라도 firstValue 프로퍼티를 변경할 수 없다.
This behavior is due to structures being value types. When an instance of a value type is marked as a constant, so are all of its properties.
이러한 동작은 구조체가 값 타입이기 때문이다. 값 타입의 인스턴스가 상수로 표시될 때, 모든 속성도 마찬가지이다.
값 타입의 인스턴스(구조체)가 상수로 선언될 경우, 인스턴스의 프로퍼티도 상수 선언으로 취급된다.
The same isn’t true for classes, which are reference types. If you assign an instance of a reference type to a constant, you can still change that instance’s variable properties.
클래스는 참조(레퍼런스) 타입이므로 동일하게 동작하지 않는다. 참조 타입의 인스턴스를 상수로 할당해도, 인스턴스의 프로퍼티 변수는 변경할 수 있다.
Lazy Stored Properties
지연 저장 프로퍼티
A lazy stored property is a property whose initial value isn’t calculated until the first time it’s used. You indicate a lazy stored property by writing the lazy modifier before its declaration.
지연 저장 프로퍼티는 처음 사용되기 전까지 초기값이 계산되지 않는 프로퍼티다. 지연 프로퍼티는 lazy 모디파이어를 선언 전에 붙여 나타낸다.
You must always declare a lazy property as a variable (with the var keyword), because its initial value might not be retrieved until after instance initialization completes. Constant properties must always have a value before initialization completes, and therefore can’t be declared as lazy.
지연 프로퍼티는 인스턴스 초기화가 완료된 이후에도 초기값이 없을 수 있으므로 (var 키워드로) 변수로 항상 선언해야 한다. 프로퍼티 상수는 항상 초기화가 완료되기 전에 값을 가져야 하므로, lazy로 선언할 수 없다.
Lazy properties are useful when the initial value for a property is dependent on outside factors whose values aren’t known until after an instance’s initialization is complete. Lazy properties are also useful when the initial value for a property requires complex or computationally expensive setup that shouldn’t be performed unless or until it’s needed.
지연 프로퍼티는 인스턴스의 초기화가 완료될 때 까지 값을 알 수 없는 외부 요인에 초기값이 의존적일 때 유용하다. 또한 지연 프로퍼티는 프로퍼티의 초기값으로 필요할 때 까지 수행하면 안되는 복잡하거나 계산 비용이 많이드는 설정을 요구하는 경우에도 유용하다.
The example below uses a lazy stored property to avoid unnecessary initialization of a complex class. This
example defines two classes called DataImporter and DataManager, neither of which is shown in full:
아래의 예제는 복잡한 클래스의 불필요한 초기화를 피하기 위해서 지연 저장 프로퍼티를 사용한다. 이 예제는 DataImporter와 DataManager라 불리는 두 클래스를 정의한다. (둘 다 완전히 상태는 아니지만)
class DataImporter {
    /*
    DataImporter is a class to import data from an external file.
    The class is assumed to take a nontrivial amount of time to initialize.
    */
    var filename = "data.txt"
    // the DataImporter class would provide data importing functionality here
		// DataImporter 클래스는 데이터 가져오기 기능을 제공함
}

class DataManager {
    lazy var importer = DataImporter()
    var data: [String] = []
    // the DataManager class would provide data management functionality here
		// DataManager 클래스는 데이터 관리 기능을 제공함
}

let manager = DataManager()
manager.data.append("Some data")
manager.data.append("Some more data")
// the DataImporter instance for the importer property hasn't yet been created
// importer 프로퍼티에 해당하는 DataImporter 인스턴스 아직 생성되지 않았음
The DataManager class has a stored property called data, which is initialized with a new, empty array
of String values. Although the rest of its functionality isn’t shown, the purpose of
this DataManager class is to manage and provide access to this array of String data.
DataManager 클래스는 빈 String 값의 배열로 초기화되는 Data라 불리는 저장 프로퍼티를 갖고 있다. 나머지 기능이 보여지지는 않지만, DataManager 클래스의 목적은 String 데이터 배열에 접근을 제공하고 관리하는 것이다.
Part of the functionality of the DataManager class is the ability to import data from a file. This
functionality is provided by the DataImporter class, which is assumed to take a nontrivial amount of
time to initialize. This might be because a DataImporter instance needs to open a file and read its
contents into memory when the DataImporter instance is initialized.
DataManager의 기능 중 일부는 파일에서 데이터를 가져오는 것이다. 이 기능은 DataImporter 클래스가 클래스가 제공하며 초기화하는데 적지 않은 시간이 걸린다고 가정한다. 이는 DataImporter 인스턴스가 초기화 될 때 DataImporter 인스턴스가 파일을 열고 그 내용을 메모리로 읽어야 하기 때문일 수 있다.
Because it’s possible for a DataManager instance to manage its data without ever importing data from a
file, DataManager doesn’t create a new DataImporter instance when the DataManager itself is created.
Instead, it makes more sense to create the DataImporter instance if and when it’s first used.
DataManager 인스턴스가 파일에서 데이터를 가져오지 않고도 데이터를 관리할 수 있기 때문에, DataManager자체가 생성될 때 DataManager는 새로운 DataImporter 인스턴스를 생성하지 않는다. 대신에 DataImporter 인스턴스가 처음 사용할 때 생성하는 것이 더 합리적이다.
DataManager 인스턴스는 멤버 변수인 importer를 사용하지 않고 data 멤버 변수만 사용할 수도 있기 때문에 lazy로 선언하여 importer를 사용할 때 DataImporter 인스턴스를 생성하는 것이 좋다는 의미다.
Because it’s marked with the lazy modifier, the DataImporter instance for the importer property is
only created when the importer property is first accessed, such as when its filename property is
queried:
lazy 모디파이어로 표시되어있기 때문에, importer 프로퍼티에 해당하는 DataImporter 인스턴스는 filename 프로퍼티가 쿼리되는 경우와 같이 importer 프로퍼티에 처음 접근했을 때에만 생성된다.
print(manager.importer.filename)
// the DataImporter instance for the importer property has now been created
// importer 프로퍼티에 해당하는 DataImporter 인스턴스가 생성됨
// Prints "data.txt"
If a property marked with the lazy modifier is accessed by multiple threads simultaneously and the property hasn’t yet been initialized, there’s no guarantee that the property will be initialized only once.
만약 lazy 모디파이어로 표시한 프로퍼티(지연 프로퍼티)가 여러 스레드에서 접근되고 프로퍼티가 아직 초기화되지 않은 경우라면, 프로퍼티가 한번만 초기화된다고 보장할 수 없다.
Stored Properties and Instance Variables
저장 프로퍼티와 인스턴스 변수
If you have experience with Objective-C, you may know that it provides two ways to store values and references as part of a class instance. In addition to properties, you can use instance variables as a backing store for the values stored in a property.
Objective-C에 대한 경험이 있다면, Objective-C가 클래스 인스턴스의 일부로 값과 참조를 저장하는 두 가지 방법을 제공한다는 것을 알 수 있다. 프로퍼티 외에도, 프로퍼티에 저장된 값의 백업 저장소로 인스턴스 변수를 사용할 수 있다.
Swift unifies these concepts into a single property declaration. A Swift property doesn’t have a corresponding instance variable, and the backing store for a property isn’t accessed directly. This approach avoids confusion about how the value is accessed in different contexts and simplifies the property’s declaration into a single, definitive statement. All information about the property — including its name, type, and memory management characteristics — is defined in a single location as part of the type’s definition.
Swift는 이러한 개념(concepts)을 단일 프로퍼티 선언으로 통합한다. Swift 프로퍼티에는 해당 인스턴스 변수가 없으며 프로퍼티의 백업 저장소에 직접 접근할 수 없다. 이 접근 방식은 다른 컨텍스트에서 값에 접근하는 방법에 대한 혼동을 피하고, 프로퍼티 선언을 하나의 최종 명령문(statement)으로 단순화한다. 프로퍼티에 대한 모든 정보(이름, 타입, 메모리 관리 특성을 포함하는)는 단일 위치에서 타입 정의의 일부로 정의된다.
Computed Properties
계산 프로퍼티
In addition to stored properties, classes, structures, and enumerations can define computed properties, which don’t actually store a value. Instead, they provide a getter and an optional setter to retrieve and set other properties and values indirectly.
저장 프로퍼티 이외에도, 클래스, 구조체, 열거형은 실제로 값을 저장하지 않는 계산 프로퍼티를 정의할 수 있다. 대신에 다른 프로퍼티와 값에 간접적으로 검색하고 설정하기 위해 getter와 선택적인(optional) setter를 제공한다.
struct Point {
    var x = 0.0, y = 0.0
}
struct Size {
    var width = 0.0, height = 0.0
}
struct Rect {
    var origin = Point()
    var size = Size()
    var center: Point {
        get {
            let centerX = origin.x + (size.width / 2)
            let centerY = origin.y + (size.height / 2)
            return Point(x: centerX, y: centerY)
        }
        set(newCenter) {
            origin.x = newCenter.x - (size.width / 2)
            origin.y = newCenter.y - (size.height / 2)
        }
    }
}
var square = Rect(origin: Point(x: 0.0, y: 0.0),
    size: Size(width: 10.0, height: 10.0))
let initialSquareCenter = square.center
// initialSquareCenter is at (5.0, 5.0)
square.center = Point(x: 15.0, y: 15.0)
print("square.origin is now at (\(square.origin.x), \(square.origin.y))")
// Prints "square.origin is now at (10.0, 10.0)"
This example defines three structures for working with geometric shapes:
이 예제는 기하학적 모양 작업을 위한 세 가지 구조체를 정의한다.
Pointencapsulates the x- and y-coordinate of a point.Sizeencapsulates awidthand aheight.Rectdefines a rectangle by an origin point and a size.
- Pointer는 포인트의 x,y 좌표를 캡슐화한다.
- Size는 너비와 높이를 캡슐화한다.
- Rect는 원본 포인트와 사이즈로 사각형을 정의한다.
The Rect structure also provides a computed property called center. The current center position of
a Rect can always be determined from its origin and size, and so you don’t need to store the center
point as an explicit Point value. Instead, Rect defines a custom getter and setter for a computed
variable called center, to enable you to work with the rectangle’s center as if it were a real stored
property.
Rect 구조체는 center라 불리는 계산 프로퍼티도 제공한다. Rect의 현재 중심 위치는 항상 origin과 size에서 결정될 수 있으므로 중심점을 명시적 Point 값으로 저장할 필요가 없다. 대신에 Rect는 커스텀 게터와 세터를 center라 불리는 계산 프로퍼티를 위해 정의하여, 실제 저장 프로퍼티인 것처럼 rect의 center를 사용하여 작업할 수 있다.
The example above creates a new Rect variable called square. The square variable is initialized with
an origin point of (0, 0), and a width and height of 10. This square is represented by the light green
square in the diagram below.
위의 예시는 square라 불리는 새로운 Rect 변수를 생성한다. square 변수는 (0, 0) 원점과 10의 너비와 높이로 초기화 된다. 이 사각형은 아래 다이어그램에서 밝은 녹색 사각형으로 표시된다.
The square variable’s center property is then accessed through dot syntax (square.center), which
causes the getter for center to be called, to retrieve the current property value. Rather than returning
an existing value, the getter actually calculates and returns a new Point to represent the center of the
square. As can be seen above, the getter correctly returns a center point of (5, 5).
square 변수의 center 프로퍼티는 점 구문(dot syntax)(squre.center)로 접근되며, 이로 인해 center에 대한 게터가 호출되어 현재 속성 값을 검색한다. 기존 값을 반환하는 대신, 게터는 실제로 사각형의 중심을 표시하기 위한 새로운 Pointer를 계산하고 반환한다. 위에서 볼 수 있듯이, 게터는 (5, 5)의 중심점을 올바르게 리턴한다.
The center property is then set to a new value of (15, 15), which moves the square up and to the
right, to the new position shown by the dark green square in the diagram below. Setting
the center property calls the setter for center, which modifies the x and y values of the
stored origin property, and moves the square to its new position.
그런 다음 center 프로퍼티는 (15, 15)의 새 값을 설정되고, 아래 다이어그램에서 짙은 녹색 사각형으로 표시된 새 위치인 오른쪽 상단으로 이동한다. center 프로퍼티를 설정하면 저장 프로퍼티인 origin 프로퍼티의 x, y 값을 수정하고 square를 새 위치로 이동하는 center를 위한 세터를 호출한다.

Shorthand Setter Declaration
빠른(속기)(Shorthand) 세터 선언
If a computed property’s setter doesn’t define a name for the new value to be set, a default name of newValue is used. Here’s an alternative version of the Rect structure that takes advantage of this shorthand notation:
계산 프로퍼티의 세터는 설정할 새 값의 이름을 정의하지 않으면, 기본 이름인 newValue가 사용된다. 다음은 이러한 속기 표기법을 활용하는 Rect 구조체의 대체 버전이다.
struct AlternativeRect {
    var origin = Point()
    var size = Size()
    var center: Point {
        get {
            let centerX = origin.x + (size.width / 2)
            let centerY = origin.y + (size.height / 2)
            return Point(x: centerX, y: centerY)
        }
        set {
            origin.x = newValue.x - (size.width / 2)
            origin.y = newValue.y - (size.height / 2)
        }
    }
}
Shorthand Getter Declaration
빠른(속기) 게터 선언
If the entire body of a getter is a single expression, the getter implicitly returns that expression.
Here’s an another version of the Rect structure that takes advantage of this shorthand notation and the
shorthand notation for setters:
게터의 전체 본문이 단일 식(single expression)이라면, 게터는 암시적으로 식을 리턴한다. 다음은 이러한 속기 표기법과 세터에 대한 속기 표기법을 활용하는 또 다른 버전의 Rect 구조체다.
struct CompactRect {
    var origin = Point()
    var size = Size()
    var center: Point {
        get {
            Point(x: origin.x + (size.width / 2),
                  y: origin.y + (size.height / 2))
        }
        set {
            origin.x = newValue.x - (size.width / 2)
            origin.y = newValue.y - (size.height / 2)
        }
    }
}
Omitting the return from a getter follows the same rules as omitting return from a function, as
described in Functions With an Implicit
Return.
Functions With an Implict Return(암시적 반환과 함께하는 함수)에서 설명된대로 게터에서 return을 생략하는 것은 함수에서 return을 생략하는 것과 같은 룰을 따른다.
Return 문을 사용하지 않더라도 값을 반환한다.
Read-Only Computed Properties
읽기 전용 계산 프로퍼티
A computed property with a getter but no setter is known as a read-only computed property. A read-only computed property always returns a value, and can be accessed through dot syntax, but can’t be set to a different value.
게터는 있지만 세터는 없는 계산 프로퍼티를 읽기 전용(read-only) 계산 프로퍼티라 한다. 읽기 전용 계산 프로퍼티는 항상 값을 리턴하고, 점 구문을 통해 접근할 수 있지만 다른 값으로 설정할 수 없다.
You must declare computed properties — including read-only computed properties — as variable properties with the var keyword, because their value isn’t fixed. The let keyword is only used for constant properties, to indicate that their values can’t be changed once they’re set as part of instance initialization.
읽기 전용 계산 프로퍼티를 포함한 계산 프로퍼티는 값이 고정되어 있지 않기 때문에 var 키워드를 사용하여 변수 프로퍼티로 반드시 선언되어야 한다. let 키워드는 인스턴스 초기화의 일부로 설정되면 해당 값을 변경할 수 없음을 나타내기 위해 상수 프로퍼티에만 사용된다.
You can simplify the declaration of a read-only computed property by removing the get keyword and its
braces:
get 키워드와 중괄호(brace)를 제거하여 읽기 전용 계산 프로퍼티의 선언을 단순화할 수 있다.
struct Cuboid {
    var width = 0.0, height = 0.0, depth = 0.0
    var volume: Double {
        return width * height * depth
    }
}
let fourByFiveByTwo = Cuboid(width: 4.0, height: 5.0, depth: 2.0)
print("the volume of fourByFiveByTwo is \(fourByFiveByTwo.volume)")
// Prints "the volume of fourByFiveByTwo is 40.0"
This example defines a new structure called Cuboid, which represents a 3D rectangular box
with width, height, and depth properties. This structure also has a read-only computed property
called volume, which calculates and returns the current volume of the cuboid. It doesn’t make sense
for volume to be settable, because it would be ambiguous as to which values of width, height,
and depth should be used for a particular volume value. Nonetheless, it’s useful for a Cuboid to
provide a read-only computed property to enable external users to discover its current calculated volume.
이 예제는 너비 높이, 깊이 프로퍼티이 있는 3D 사각형 박스를 표시하는 Cuboid라 불리는 새로운 구조체를 정의한다. 이 구조체는 직육면체의 현재 부피를 계산하고 리턴하는 volume이라 불리는 읽기 전용 계산 프로퍼티도 갖고 있다. 특정 volume 값에 대해 너비, 높이, 깊이를 사용해야 하는지 모호하기 때문에 volume을 설정 가능하다는 것은 이치에 맞지 않는다. 그럼에도 불구하고 Cuboid가 외부 사용자가 현재 계산된 볼륨(부피)을 발견할 수 있도록 읽기 전용 계산 프로퍼티를 제공하는 것은 유용하다.
Property Observers
프로퍼티 옵저버(관찰자)
Property observers observe and respond to changes in a property’s value. Property observers are called every time a property’s value is set, even if the new value is the same as the property’s current value.
프로퍼티 옵저버는 프로퍼티 값의 변화를 관찰하고 반응한다. 프로퍼티 옵저버는 새로운 값이 프로퍼티의 현재 값과 동일한 경우에도 프로퍼티의 값이 설정될 때마다 호출된다.
You can add property observers in the following places:
다음 위치에서 프로퍼티 옵저버를 추가할 수 있다.
- Stored properties that you define
- Stored properties that you inherit
- Computed properties that you inherit
- 정의하는 저장 프로퍼티
- 상속받은 저장 프로퍼티
- 상속받은 계산 프로퍼티
For an inherited property, you add a property observer by overriding that property in a subclass. For a computed property that you define, use the property’s setter to observe and respond to value changes, instead of trying to create an observer. Overriding properties is described in Overriding.
상속된 프로퍼티의 경우, 서브클래스에서 해당 프로퍼티를 재정의(overriding)하여 프로퍼티 옵저버를 추가할 수 있다. 정의한 계산 프로퍼티의 경우, 옵저버를 생성하려고 시도하는 대신에 프로퍼티의 세터를 사용하여 값 변경을 관찰하고 응답한다. 재정의 프로퍼티는 재정의(Overriding)에 설명되어 있다.
You have the option to define either or both of these observers on a property:
프로퍼티에서 이러한 관찰자(옵저버) 중 하나 혹은 모두를 정의하는 옵션이 있다.
willSetis called just before the value is stored.didSetis called immediately after the new value is stored.
- willSet은 값이 저장되기 직전에 호출된다.
- didSet은 새 값이 저장된 직후에 호출된다.
If you implement a willSet observer, it’s passed the new property value as a constant parameter. You can
specify a name for this parameter as part of your willSet implementation. If you don’t write the
parameter name and parentheses within your implementation, the parameter is made available with a default
parameter name of newValue.
willSet 옵저버를 구현하면, 상수 파라미터(매개변수)로 새로운 값이 전달된다. willSet 구현의 일부로 이 파라미터의 이름을 지정할 수 있다. 구현 시 파라미터 이름과 괄호를 작성하지 않으면, 기본 파라미터 이름인 newValue로 파라미터를 사용할 수 있다.
Similarly, if you implement a didSet observer, it’s passed a constant parameter containing the old
property value. You can name the parameter or use the default parameter name of oldValue. If you assign
a value to a property within its own didSet observer, the new value that you assign replaces the one
that was just set.
마찬가지로, didSet 옵저버를 구현하면, 이전 파라미터 값이 포함된 상수 파라미터가 전달된다. 파라미터의 이름을 지정하거나 oldValue라는 기본 파라미터 이름을 사용할 수 있다. didSet 옵저버 내의 프로퍼티에 값을 할당하면, 할당한 새 값은 방금 설정된 값을 대체한다.
The willSet and didSet observers of superclass properties are called when a property
is set in a subclass initializer, after the superclass initializer has been called.
They aren’t called while a class is setting its own properties,
before the superclass initializer has been called.
For more information about initializer delegation, see Initializer Delegation for Value Types and Initializer Delegation for Class Types.
슈퍼클래스 프로퍼티의 willSet과 didSet 옵저버는 슈퍼 클래스가 호출된 후 서브클래스 이니셜라이저에서 프로퍼티가 설정될 때에 호출된다. 클래스가 자신의 프로퍼티를 설정하는 동안, 슈퍼클래스 이니셜라이저가 호출되기 전에 호출되지 않는다.
이니셜라이저 위임에 대한 더 많은 정보는 Initalizer Delegation for Value Types(값 유형에 대한 이니셜라이저 위임) 및 Initalizer Delegation for Class Types(클래스 유형에 대한 이니셜라이저)를 참조하자.
Here’s an example of willSet and didSet in action. The example below defines a new class
called StepCounter, which tracks the total number of steps that a person takes while walking. This class
might be used with input data from a pedometer or other step counter to keep track of a person’s exercise
during their daily routine.
다음은 동작중인 willSet과 didSet 예제다. 아래의 예제에는 사람이 걷는 동안의 총 걸음 수를 추적하는 StepCounter라 불리는 새로운 클래스가 정의되어 있다. 이 클래스는 만보계 혹은 다른 만보계(step counter) 의 입력 데이터 함께 사용되어 일상 생활에서의 운동을 추적할 수 있다.
class StepCounter {
    var totalSteps: Int = 0 {
        willSet(newTotalSteps) {
            print("About to set totalSteps to \(newTotalSteps)")
        }
        didSet {
            if totalSteps > oldValue  {
                print("Added \(totalSteps - oldValue) steps")
            }
        }
    }
}
let stepCounter = StepCounter()
stepCounter.totalSteps = 200
// About to set totalSteps to 200
// Added 200 steps
stepCounter.totalSteps = 360
// About to set totalSteps to 360
// Added 160 steps
stepCounter.totalSteps = 896
// About to set totalSteps to 896
// Added 536 steps
The StepCounter class declares a totalSteps property of type Int. This is a stored property
with willSet and didSet observers.
StepCounter 클래스는 정수 타입의 totalSteps 프로퍼티를 정의한다. 이것은 willSet과 didSet 옵저버가 있는 저장 프로퍼티다.
The willSet and didSet observers for totalSteps are called whenever the property is assigned a new
value. This is true even if the new value is the same as the current value.
totalSteps의 willSet과 didSet 옵저버는 프로퍼티에 새 값이 할당될 때마다 호출된다. 이것은 새 값이 현재 값과 같은 경우에도 동일하다.
This example’s willSet observer uses a custom parameter name of newTotalSteps for the upcoming new
value. In this example, it simply prints out the value that’s about to be set.
이 예제의 willSet 옵저버는 다가오는 새 값에 대해 newTotalSteps라는 이름의 커스텀 파라미터를 사용한다. 이 예제는 설정하려는 값에 대해 간단히 출력하는 예제다
The didSet observer is called after the value of totalSteps is updated. It compares the new value
of totalSteps against the old value. If the total number of steps has increased, a message is printed to
indicate how many new steps have been taken. The didSet observer doesn’t provide a custom parameter name
for the old value, and the default name of oldValue is used instead.
didSet 옵저버가 totalSteps가 업데이트 된 이후에 호출된다. totalSteps의 새 값을 이전 값과 비교한다. 총 걸음 수가 증가되면, 추가적으로 얼마나 걸었는지 나타내는 메세지가 출력된다. didSet 옵저버는 이전 값에 대한 커스텀 파라미터 이름을 제공하지 않으며 대신에 oldValue라는 기본 이름이 사용된다.
If you pass a property that has observers to a function as an in-out parameter, the willSet and didSet observers are always called. This is because of the copy-in copy-out memory model for in-out parameters: The value is always written back to the property at the end of the function. For a detailed discussion of the behavior of in-out parameters, see In-Out Parameters.
옵저버가 있는 프로퍼티를 함수에 인-아웃 파라미터(in-out parameter)로 전달하면 willSet과 didSet옵저버는 항상 호출된다. 이는 인-아웃 파라미터에 대한 copy-in copy-out 메모리 모델 때문이다. 값은 항상 함수의 끝에서 프로퍼티에 다시 기록된다. 인-아웃 파라미터에 대한 동작에 대한 자세한 논의에 대해서는 인-아웃 파라미터를 참조하자.
인-아웃 파라미터로 전달되는 프로퍼티는 항상 복사(copy)된다. 프로퍼티의 값은 기존 값을 새 값을 덮어쓰게 된다.
Property Wrappers
프로퍼티 래퍼
A property wrapper adds a layer of separation between code that manages how a property is stored and the code that defines a property. For example, if you have properties that provide thread-safety checks or store their underlying data in a database, you have to write that code on every property. When you use a property wrapper, you write the management code once when you define the wrapper, and then reuse that management code by applying it to multiple properties.
프로퍼티 래퍼는 프로퍼티가 저장되는 방식을 관리하는 코드와 프로퍼티를 정의하는 코드 사이에 분리 레이어를 추 가한다. 예를 들어, 프로퍼티가 스레드 안전 검사(thread-safety check)나 기본 데이터를 데이터베이스에 저장하는 프로퍼티가 있는 경우, 모든 프로퍼티에 해당 코드를 작성해야 한다. 프로퍼티 래퍼를 사용하는 경우, 래퍼를 정의할 때 관리 코드를 한 번 작성하고 여러 프로퍼티에 적용하여 해당 관리 코드를 재사용한다.
To define a property wrapper, you make a structure, enumeration, or class that defines
a wrappedValue property. In the code below, the TwelveOrLess structure ensures that the value it wraps
always contains a number less than or equal to 12. If you ask it to store a larger number, it stores 12
instead.
프로퍼티 래퍼를 정의하려면, wrappedValue 프로퍼티를 정의하는 구조체, 열거형, 클래스를 만들어야 한다. 아래의 코드에서, TwelveOrLess 구조체는 래핑하는 값이 항상 12보다 같거나 작은 숫자를 포함하도록 보장한다. 더 큰 숫자를 저장하도록 요청하면, 대신에 12를 저장한다.
@propertyWrapper
struct TwelveOrLess {
    private var number = 0
    var wrappedValue: Int {
        get { return number }
        set { number = min(newValue, 12) }
    }
}
The setter ensures that new values are less than or equal to 12, and the getter returns the stored value.
세터는 새 값이 12보다 같거나 작은지 보장하고, 게터는 저장된 값을 리턴한다.
The declaration for number in the example above marks the variable as private, which ensures number is used only in the implementation of TwelveOrLess. Code that’s written anywhere else accesses the value using the getter and setter for wrappedValue, and can’t use number directly. For information about private, see Access Control.
위에 예제에서 number의 선언은 private 변수로 표시하여 number는 오직 TwelveOrLess의 구현에서만 사용되도록 보장한다. 다른 곳에서 작성된 코드는 wrappedValue 대한 게터와 세터를 사용하여 값에 접근하고, 직접적으로는 number를 사용할 수 없다. private에 대한 자세한 정보는 Access Control(접근 제어)를 참조하자.
You apply a wrapper to a property by writing the wrapper’s name before the property as an attribute.
Here’s a structure that stores a rectangle that uses the TwelveOrLess property wrapper to ensure its
dimensions are always 12 or less:
속성(attribute)으로 프로퍼티 앞에 이름을 작성하여 프로퍼티에 래퍼를 적용한다. 다음은 치수(dimensions)가 항상 12보다 같거나 작도록 보장하도록 TwelveOrLess 프로퍼티 래퍼를 사용하여 사각형을 저장하는 구조체다.
struct SmallRectangle {
    @TwelveOrLess var height: Int
    @TwelveOrLess var width: Int
}

var rectangle = SmallRectangle()
print(rectangle.height)
// Prints "0"

rectangle.height = 10
print(rectangle.height)
// Prints "10"

rectangle.height = 24
print(rectangle.height)
// Prints "12"
The height and width properties get their initial values from the definition of TwelveOrLess, which
sets TwelveOrLess.number to zero. The setter in TwelveOrLess treats 10 as a valid value so storing the
number 10 in rectangle.height proceeds as written. However, 24 is larger than TwelveOrLess allows, so
trying to store 24 end up setting rectangle.height to 12 instead, the largest allowed value.
높이와 너비 프로퍼티는 TwelveOrLess.number를 0으로 설정하는 TwelveOrLess에서의 정의로부터 초기값을 가져온다. TwelveOrLess의 세터는 10을 유효한 값으로 취급하므로 rectangle.height에 숫자 10을 저장하면 쓰여진대로 진행된다. 그러나 24는 TwelveOrLess가 허용하는 것보다 크므로, rectangle.height에 24를 저장하려고 시도하면 결국 허용된 가장 큰 값인 12를 대신 설정된다.
When you apply a wrapper to a property, the compiler synthesizes code that provides storage for the
wrapper and code that provides access to the property through the wrapper. (The property wrapper is
responsible for storing the wrapped value, so there’s no synthesized code for that.) You could write code
that uses the behavior of a property wrapper, without taking advantage of the special attribute syntax.
For example, here’s a version of SmallRectangle from the previous code listing that wraps its properties
in the TwelveOrLess structure explicitly, instead of writing @TwelveOrLess as an attribute:
프로퍼티 래퍼를 적용하면, 컴파일러는 래퍼에 스토리지(저장소)를 제공하는 코드와 래퍼를 통해 프로퍼티에 대한 접근을 제공하는 코드를 합성한다.(프로퍼티 래퍼는 저장된 값을 저장하는 역할을 하므로, 이에 대한 합성 코드가 없다.) 특별한 속성 구문을 사용하지 않고 프로퍼티 래퍼의 동작을 사용하는 코드를 작성할 수 있다. 예를 들어, 다음은 속성(attribute)으로 @TwelveOrLess 작성하는 대신 프로퍼티를 TwelveOrLess 구조체로 명시적으로 래핑하는 이전 코드 목록(위의 코드 예제)의 SmallRectangle의 버전이다.
struct SmallRectangle {
    private var _height = TwelveOrLess()
    private var _width = TwelveOrLess()
    var height: Int {
        get { return _height.wrappedValue }
        set { _height.wrappedValue = newValue }
    }
    var width: Int {
        get { return _width.wrappedValue }
        set { _width.wrappedValue = newValue }
    }
}
The _height and _width properties store an instance of the property wrapper, TwelveOrLess. The
getter and setter for height and width wrap access to the wrappedValue property.
_height와 _width 프로퍼티는 프로퍼티 래퍼인 TwelveOrLess 인스턴스를 저장한다. height와 width에 대한 게터와 세터는 wrappedValue 프로퍼티에 대한 접근을 랩핑한다.
Setting Initial Values for Wrapped Properties
랩핑된 프로퍼티를 위한 초기값 설정
The code in the examples above sets the initial value for the wrapped property by giving number an
initial value in the definition of TwelveOrLess. Code that uses this property wrapper can’t specify a
different initial value for a property that’s wrapped by TwelveOrLess — for example, the definition
of SmallRectangle can’t give height or width initial values. To support setting an initial value or
other customization, the property wrapper needs to add an initializer. Here’s an expanded version
of TwelveOrLess called SmallNumber that defines initializers that set the wrapped and maximum value:
위 예제의 코드는 TwelveOrLess의 정의에서 number의 초기값을 제공하여 wrapped property의 초기값을 설정한다. 이 프로퍼티 래퍼를 사용하는 코드는 TweleveOrLess로 래핑된 프로퍼티에 대해 다른 초기값을 지정할 수 없다. - 예를 들어, SmallRectangle의 정의는 높이나 너비의 초기값을 제공할 수 없다. 초기값 설정 또는 다른 커스터마이징을 지원하려면, 프로퍼티 래퍼에서 이니셜라이저를 추가해야 한다. 다음은 래핑된 값과 최대값을 설정하는 이니셜라이저를 정의하는 SamllNumber라 불리는 TwelveOrLess의 확장된 버전이다.
@propertyWrapper
struct SmallNumber {
    private var maximum: Int
    private var number: Int

    var wrappedValue: Int {
        get { return number }
        set { number = min(newValue, maximum) }
    }

    init() {
        maximum = 12
        number = 0
    }
    init(wrappedValue: Int) {
        maximum = 12
        number = min(wrappedValue, maximum)
    }
    init(wrappedValue: Int, maximum: Int) {
        self.maximum = maximum
        number = min(wrappedValue, maximum)
    }
}
The definition of SmallNumber includes three initializers — init(), init(wrappedValue:),
and init(wrappedValue:maximum:) — which the examples below use to set the wrapped value and the maximum
value. For information about initialization and initializer syntax,
see Initialization
SmallNumber의 정의에는 아래의 예제에서 래핑된 값과 최대값을 설정하는데 사용하는 세 가지 이니셜라이저(init(), init(wrappedValue:), init(wrappedValue: maximum:))를 포함한다. 초기화와 이니셜라이저 구문에 대한 자세한 설명은 초기화를 참조하자.
When you apply a wrapper to a property and you don’t specify an initial value, Swift uses
the init() initializer to set up the wrapper. For example:
래퍼를 프로퍼티에 적용할 때 초기값을 지정하지 않으면, 스위프트는 init() 이니셜라이저를 사용하여 래퍼를 설정한다. 예를 들어:
struct ZeroRectangle {
    @SmallNumber var height: Int
    @SmallNumber var width: Int
}

var zeroRectangle = ZeroRectangle()
print(zeroRectangle.height, zeroRectangle.width)
// Prints "0 0"
The instances of SmallNumber that wrap height and width are created by calling SmallNumber(). The
code inside that initializer sets the initial wrapped value and the initial maximum value, using the
default values of zero and 12. The property wrapper still provides all of the initial values, like the
earlier example that used TwelveOrLess in SmallRectangle. Unlike that example, SmallNumber also
supports writing those initial values as part of declaring the property.
높이와 너비를 래핑한 SmallNumber의 인스턴스는 SamllNumber()를 호출하여 생성된다. 이니셜라이저의 내부 코드에서는 기본 값인 0과 12를 사용하여 초기 래핑값을 설정하고 초기 최대값을 설정한다. 프로퍼티 래퍼는 SamllRectangle 안에 TwelveOrLess가 사용된 이전 예제처럼 여전히 모든 초기값을 제공한다. 그 예제와 달리, SmallNumber는 프로퍼티 선언의 일부로 초기값을 작성하는 것을 지원한다.
When you specify an initial value for the property, Swift uses the init(wrappedValue:) initializer to
set up the wrapper. For example:
프로퍼티의 초기값을 지정하면, 스위프트는 init(wrappedValue:) 이니셜라이저를 사용하여 래퍼를 설정한다. 예를 들어:
struct UnitRectangle {
    @SmallNumber var height: Int = 1
    @SmallNumber var width: Int = 1
}

var unitRectangle = UnitRectangle()
print(unitRectangle.height, unitRectangle.width)
// Prints "1 1"
When you write = 1 on a property with a wrapper, that’s translated into a call to
the init(wrappedValue:) initializer. The instances of SmallNumber that wrap height and width are
created by calling SmallNumber(wrappedValue: 1). The initializer uses the wrapped value that’s specified
here, and it uses the default maximum value of 12.
래퍼가 있는 프로퍼티에 = 1 를 작성하면, init(wrappedValue:) 이니셜라이저에 대한 호출로 변환된다.
SmallNumber 인스턴스가 래핑된 height와 width는 SmallNumber(wrappedValue: 1)를 호출하여 생성된다.
이니셜라이저는 여기서 지정된 래핑된 값을 사용하며 기본 최대값인 12를 사용한다.
When you write arguments in parentheses after the custom attribute, Swift uses the initializer that
accepts those arguments to set up the wrapper. For example, if you provide an initial value and a maximum
value, Swift uses the init(wrappedValue:maximum:) initializer:
커스텀 속성 뒤에 괄호 안에 인수를 작성할 때, 스위프트는 인수(파라미터)(arguments)를 허용하는 이니셜라이저를 사용하여 래퍼를 설정한다. 예를 들어, 초기값과 최대값을 제공하면, 스위프트는 init(wrappedValue: maximum:) 이니셜라이저를 사용한다.
struct NarrowRectangle {
    @SmallNumber(wrappedValue: 2, maximum: 5) var height: Int
    @SmallNumber(wrappedValue: 3, maximum: 4) var width: Int
}

var narrowRectangle = NarrowRectangle()
print(narrowRectangle.height, narrowRectangle.width)
// Prints "2 3"

narrowRectangle.height = 100
narrowRectangle.width = 100
print(narrowRectangle.height, narrowRectangle.width)
// Prints "5 4"
The instance of SmallNumber that wraps height is created by calling SmallNumber(wrappedValue: 2, maximum: 5), and the instance that wraps width is created by calling SmallNumber(wrappedValue: 3, maximum: 4).
height를 래핑하는 SmallNumber의 인스턴스는 SmallNumber(wrappedValue:2, maximum: 5)를 호출하여 생성되고, width를 래핑하는 인스턴스는 SmallNumber(wrappedValue: 3, maximum:4)fmf 호출하여 생성된다.
By including arguments to the property wrapper, you can set up the initial state in the wrapper or pass other options to the wrapper when it’s created. This syntax is the most general way to use a property wrapper. You can provide whatever arguments you need to the attribute, and they’re passed to the initializer.
프로퍼티 래퍼에 인수를 포함하면, 초기값을 설정하거나, 생성 시 다른 옵션을 래퍼에게 전달할 수 있다. 이 구문은 프로퍼티 래퍼를 사용하는 가장 일반적인 방법이다. 속성에 필요한 어떠한 인수도 제공할 수 있고, 그것들은 초기자로 전달된다.
When you include property wrapper arguments, you can also specify an initial value using assignment. Swift
treats the assignment like a wrappedValue argument and uses the initializer that accepts the arguments
you include. For example:
프로퍼티 래퍼 인수를 포함할 때, 할당을 사용하여 초기값을 지정할 수 있다. 스위프트는 할당을 wrappedValue 인수처럼 취급하고 포함된 인수를 허용된 이니셜라이저를 사용한다. 예를 들어:
struct MixedRectangle {
    @SmallNumber var height: Int = 1
    @SmallNumber(maximum: 9) var width: Int = 2
}

var mixedRectangle = MixedRectangle()
print(mixedRectangle.height)
// Prints "1"

mixedRectangle.height = 20
print(mixedRectangle.height)
// Prints "12"
The instance of SmallNumber that wraps height is created by calling SmallNumber(wrappedValue: 1),
which uses the default maximum value of 12. The instance that wraps width is created by
calling SmallNumber(wrappedValue: 2, maximum: 9).
height를 래핑하는 SmallNumber 인스턴스는 기본 최대 값인 12를 사용하는 SmallNumber(wrappedValue: 1)를 호출하여 생성된다. width를 래핑하는 인스턴스는 SmallNumber(wrappedValue:2, maximum: 9)를 호출하여 생성된다.
Projecting a Value From a Property Wrapper
프로퍼티 래퍼에서 값 프로젝션
In addition to the wrapped value, a property wrapper can expose additional functionality by defining
a projected value — for example, a property wrapper that manages access to a database can expose
a flushDatabaseConnection() method on its projected value. The name of the projected value is the same
as the wrapped value, except it begins with a dollar sign ($). Because your code can’t define properties
that start with $ the projected value never interferes with properties you define.
래핑된 값 이외에도, 프로퍼티 래퍼는 프로젝션된 값을 정의하여 추가 기능을 노출할 수 있다. 예를 들어,
데이터베이스에 대한 접근을 관리하는 프로퍼티 래퍼는 프로젝션 된 값에 대해 flushDatabaseConnection()
메서드를 노출할 수 있다. 프로젝션 값의 이름은 앞에 달러 사인($)이 오는 것 이외에는 래핑된 값과 동일하다.
코드는 $로 시작하는 프로퍼티를 정의할 수 없기 때문에 프로젝션된 값은 정의한 프로퍼티를 방해하지 않는다.
머라는지 모르겠다
In the SmallNumber example above, if you try to set the property to a number that’s too large, the
property wrapper adjusts the number before storing it. The code below adds a projectedValue property to
the SmallNumber structure to keep track of whether the property wrapper adjusted the new value for the
property before storing that new value.
위의 예제의 SmallNumber에서, 프로퍼티를 너무 큰 숫자로 설정하려 하면 프로퍼티 래퍼가 저장하기 전에 숫자를 조정한다. 아래 코드는 새 값을 저장하기 전에 프로퍼티 래퍼가 프로퍼티의 값을 조정했는지 추적하기 위해 SmallNumber 구조체에 projectedValue 프로퍼티를 추가한다.
@propertyWrapper
struct SmallNumber {
    private var number: Int
    private(set) var projectedValue: Bool

    var wrappedValue: Int {
        get { return number }
        set {
            if newValue > 12 {
                number = 12
                projectedValue = true
            } else {
                number = newValue
                projectedValue = false
            }
        }
    }

    init() {
        self.number = 0
        self.projectedValue = false
    }
}
struct SomeStructure {
    @SmallNumber var someNumber: Int
}
var someStructure = SomeStructure()

someStructure.someNumber = 4
print(someStructure.$someNumber)
// Prints "false"

someStructure.someNumber = 55
print(someStructure.$someNumber)
// Prints "true"
Writing someStructure.$someNumber accesses the wrapper’s projected value. After storing a small number
like four, the value of someStructure.$someNumber is false. However, the projected value
is true after trying to store a number that’s too large, like 55.
someStructure.$someNumber를 작성하면 래퍼의 프로젝션된 값에 접근한다. 4와 같은 작은 숫자를 저장한 후에,
someStructure.$someNumber의 값은 false다. 그러나 55와 같은 매우 큰 숫자를 저장하려 시도한 이후에
프로젝션 값은 true가 된다.
A property wrapper can return a value of any type as its projected value. In this example, the property
wrapper exposes only one piece of information — whether the number was adjusted — so it exposes that
Boolean value as its projected value. A wrapper that needs to expose more information can return an
instance of some other type, or it can return self to expose the instance of the wrapper as its
projected value.
프로퍼티 래퍼는 어떤한 타입의 값도 프로젝션된 값으로 리턴할 수 있다. 이 예에서, 프로퍼티 래퍼는 숫자가 조정되었는지 여부와 같은 오직 한 가지 정보만 노출하므로 해당 불리언 값을 프로젝션 값으로 노출한다. 더 많은 정보의 노출이 필요한 래퍼는 다른 타입의 인스턴스를 리턴하거나, self를 리턴하여 인스턴스의 래퍼를 프로젝션 값으로 노출할 수 있다.
When you access a projected value from code that’s part of the type, like a property getter or an instance
method, you can omit self. before the property name, just like accessing other properties. The code in
the following example refers to the projected value of the wrapper
around height and width as $height and $width:
프로퍼티 게터나 인스턴스 메서드와 같은 타입의 일부인 코드에서 프로젝션 값에 접근할 때, 다른 프로퍼티에
접근하는 것처럼 프로퍼티 이름 앞에 self.를 생략할 수 있다. 다음 예제의 코드는 $hegiht와 $width로
height과 width 주변 래퍼의 프로젝션 값을 참조한다.
enum Size {
    case small, large
}

struct SizedRectangle {
    @SmallNumber var height: Int
    @SmallNumber var width: Int

    mutating func resize(to size: Size) -> Bool {
        switch size {
        case .small:
            height = 10
            width = 20
        case .large:
            height = 100
            width = 100
        }
        return $height || $width
    }
}
Because property wrapper syntax is just syntactic sugar for a property with a getter and a setter,
accessing height and width behaves the same as accessing any other property. For example, the code
in resize(to:) accesses height and width using their property wrapper. If you call resize(to: .large), the switch case for .large sets the rectangle’s height and width to 100. The wrapper prevents
the value of those properties from being larger than 12, and it sets the projected value to true, to
record the fact that it adjusted their values. At the end of resize(to:), the return statement
checks $height and $width to determine whether the property wrapper adjusted
either height or width.
프로퍼티 래퍼 구문은 게터와 세터가 있는 문법적 설탕일 뿐이므로, height와 width 접근하는 것은 다른
프로퍼티에 접근하는 것과 동일하게 동작한다. 예를 들어, resize(to:) 코드는 프로퍼티 래퍼를 사용해서
height와 width에 접근한다. resize(to: .large)를 호출하면, .large 스위치 케이스는 사각형의 높이와
너비는 100으로 설정한다. 래퍼는 해당 프로퍼티의 값이 12보다 커지는 것을 방지하고, 프로젝션 값을 ture로
설정하여, 값이 조정되었다는 사실을 기록한다. resize(to:)의 끝에서, 리턴문은 프로퍼티 래퍼가 height
또는 width를 조정했는지 여부를 결정하기 위해 $height과 $width를 확인한다.
Global and Local Variables
글로벌(전역) 변수와 로컬(지역) 변수
The capabilities described above for computing and observing properties are also available to global variables and local variables. Global variables are variables that are defined outside of any function, method, closure, or type context. Local variables are variables that are defined within a function, method, or closure context.
계산 및 옵저빙(관찰된) 프로퍼티 위에서 설명한 기능은 저녁 변수 및 지역 변수에도 사용할 수 있다. 전역 변수는 어떤한 함수, 메서드, 클로저 혹은 타입 컨택스트 외부에서 정의되는 변수다. 지역 변수는 함수, 메서드, 클로저 컨택스트 내에서 정의되는 변수다.
The global and local variables you have encountered in previous chapters have all been stored variables. Stored variables, like stored properties, provide storage for a value of a certain type and allow that value to be set and retrieved.
이전 장에서 만났던 전역 변수와 지역 변수는 모두 저장 변수였다. 저장 프로퍼티와 같은 저장 변수는 특정 타입의 값에 대한 저장소를 제공하고 제공하고, 해당 값을 설정하고 검색할 수 있도록 허용한다.
However, you can also define computed variables and define observers for stored variables, in either a global or local scope. Computed variables calculate their value, rather than storing it, and they’re written in the same way as computed properties.
그러나 글로벌 또는 로컬 스코프에서 계산 변수와 저장 변수에 대한 옵저버(관찰자)를 정의할 수 있다. 계산 변수는 값을 저장하는 대신 값을 계산하며, 계산 프로퍼티와 동일한 방식으로 작성된다.
Global constants and variables are always computed lazily,
in a similar manner to Lazy Stored Properties.
Unlike lazy stored properties, global constants and variables don’t need to be marked with the lazy modifier.
전역 상수나 변수는 Lazy Stored Properties와 비슷한 방식으로 항상 느리게(lazily) 계산된다. lazy 저장 프로퍼티와 달리 전역 상수나 변수는 lazy 모디파이어를 표시할 필요가 없다.
지역 상수나 변수는 결코 느리게 계산되지 않는다.
You can apply a property wrapper to a local stored variable, but not to a global variable or a computed
variable. For example, in the code below, myNumber uses SmallNumber as a property wrapper.
프로퍼티 래퍼를 로컬 저장 변수에 적용할 수 있지만, 전역 변수나 계산 프로퍼티에는 적용할 수 없다. 예를 들어 아래의 코드에서, myNumber는 SmallNumber를 프로퍼티 래퍼로 사용한다.
func someFunction() {
    @SmallNumber var myNumber: Int = 0

    myNumber = 10
    // now myNumber is 10

    myNumber = 24
    // now myNumber is 12
}
Like when you apply SmallNumber to a property, setting the value of myNumber to 10 is valid. Because
the property wrapper doesn’t allow values higher than 12, it sets myNumber to 12 instead of 24.
프로퍼티에 SmallNumber를 적용할 때와 마찬가지로, myNumber를 10으로 설정하는 것은 유효하다. 프로퍼티 래퍼는 12보다 큰 값을 허용하지 않기 때문에, myNumber는 24 대신에 12로 설정된다.
Type Properties
타입 프로퍼티
Instance properties are properties that belong to an instance of a particular type. Every time you create a new instance of that type, it has its own set of property values, separate from any other instance.
인스턴스 프로퍼티는 특정한 타입의 인스턴스에 속하는 프로퍼티다. 해당 유형의 새 인스턴스가 생성될 때 마다, 다른 인스턴스와 별도로 고유한 프로퍼티 값 집합이 있다.
You can also define properties that belong to the type itself, not to any one instance of that type. There will only ever be one copy of these properties, no matter how many instances of that type you create. These kinds of properties are called type properties.
해당 타입의 인스턴스가 아닌 타입 자체에 속하는 프로퍼티를 정의할 수 있다. 생성하는 해당 타입의 인스턴스의 수와 관계없이 이러한 프로퍼티의 복사본은 하나만 있다. 이러한 종류의 프로퍼티를 타입 프로퍼티라 한다.
Type properties are useful for defining values that are universal to all instances of a particular type, such as a constant property that all instances can use (like a static constant in C), or a variable property that stores a value that’s global to all instances of that type (like a static variable in C).
타입 프로퍼티는 모든 인스턴스가 사용할 수 있는 상수 속성(C의 정적 상수) 또는 모든 인스턴스에 전역적인 값을 저장하는 변수 프로퍼티(C의 정적 변수와 같은)와 같은 특정 타입의 모든 인스턴스의 보편적인 값을 정의하는데 유용하다.
Stored type properties can be variables or constants. Computed type properties are always declared as variable properties, in the same way as computed instance properties.
저장된 타입 프로퍼티는 변수 혹은 상수일 수 있다. 계산 타입 프로퍼티는 계산 인스턴스 프로퍼티와 같은 방식으로 항상 변수로 선언된다.
Unlike stored instance properties, you must always give stored type properties a default value. This is because the type itself doesn’t have an initializer that can assign a value to a stored type property at initialization time.
Stored type properties are lazily initialized on their first access.
They’re guaranteed to be initialized only once, even when accessed by multiple threads simultaneously,
and they don’t need to be marked with the lazy modifier.
저장 인스턴스 프로퍼티와 다르게, 항상 저장 타입 프로퍼티에는 기본값을 제공해야 한다. 이는 타입 자체에는 자초기화 시 저장된 타입 프로퍼티에 값을 할당할 수 있는 이니셜라이저가 없기 때문이다.
저장 타입 프로퍼티는 처음 접근할 때 지연 초기화된다. 여러 스레드에서 동시에 액세스하는 경우에도 한번만 초기화되도록 보장되며, lazy 모디파이어로 표시할 필요가 없다.
Type Property Syntax
타입 프로퍼티 구문
In C and Objective-C, you define static constants and variables associated with a type as global static variables. In Swift, however, type properties are written as part of the type’s definition, within the type’s outer curly braces, and each type property is explicitly scoped to the type it supports.
C와 Objective-C에서, 타입과 연관된 정적 상수 혹은 변수를 전역 정적 변수로 정의한다. 그러나 스위프트에서 타입 프로퍼티는 타입의 바깥쪽 중괄호 내에서 타입 정의의 일부로 작성되며, 각 타입 프로퍼티는 지원하는 타입으로 명시적으로 범위가 지정된다.
You define type properties with the static keyword. For computed type properties for class types, you
can use the class keyword instead to allow subclasses to override the superclass’s implementation. The
example below shows the syntax for stored and computed type properties:
static 키워드로 타입 프로퍼티를 정의한다. 클래스 타입을 위한 계산 타입 프로퍼티의 경우 class 키워드 대신 서브클래스가 슈퍼 클래스의 구현을 재정의(override)하도록 허용할 수 있다. 아래 예제는 저장 및 계산 프로퍼티 속성의 구문을 보여준다.
struct SomeStructure {
    static var storedTypeProperty = "Some value."
    static var computedTypeProperty: Int {
        return 1
    }
}
enum SomeEnumeration {
    static var storedTypeProperty = "Some value."
    static var computedTypeProperty: Int {
        return 6
    }
}
class SomeClass {
    static var storedTypeProperty = "Some value."
    static var computedTypeProperty: Int {
        return 27
    }
    class var overrideableComputedTypeProperty: Int {
        return 107
    }
}
The computed type property examples above are for read-only computed type properties, but you can also define read-write computed type properties with the same syntax as for computed instance properties.
위 예제의 계산 타입 프로퍼티는 읽기 전용 계산 타입 프로퍼티지만, 계산 인스턴스 프로퍼티와 동일한 구문을 사용하여 읽기 - 쓰기 계산 타입 프로퍼티로 정의할 수 있다.
Querying and Setting Type Properties
타입 프로퍼티 쿼리 및 설정
Type properties are queried and set with dot syntax, just like instance properties. However, type properties are queried and set on the type, not on an instance of that type. For example:
타입 프로퍼티는 인스턴스 프로퍼티와 마찬가지로 점 구문으로 쿼리 및 설정된다. 그러나, 타입 프로퍼티는 타입의 인스턴스가 아니라 타입에 대해 쿼리되고 설정된다.
print(SomeStructure.storedTypeProperty)
// Prints "Some value."
SomeStructure.storedTypeProperty = "Another value."
print(SomeStructure.storedTypeProperty)
// Prints "Another value."
print(SomeEnumeration.computedTypeProperty)
// Prints "6"
print(SomeClass.computedTypeProperty)
// Prints "27"
The examples that follow use two stored type properties as part of a structure that models an audio level
meter for a number of audio channels. Each channel has an integer audio level
between 0 and 10 inclusive.
다음 예제에서는 오디오 채널에 대한 오디오 레벨 미터를 모델링하는 구조체의 일부로 두 개의 저장 타입 프로퍼티를 사용한다. 각 채널은 0과 10 사이의 정수 오디오 레벨을 가진다.
The figure below illustrates how two of these audio channels can be combined to model a stereo audio level
meter. When a channel’s audio level is 0, none of the lights for that channel are lit. When the audio
level is 10, all of the lights for that channel are lit. In this figure, the left channel has a current
level of 9, and the right channel has a current level of 7:
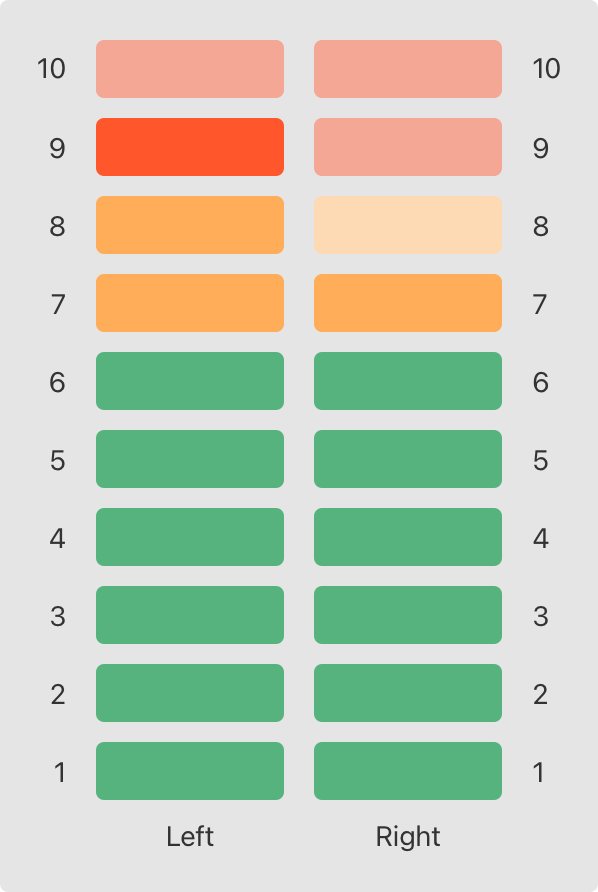
아래 그림은 이러한 오디오 채널 중 두 개를 결합하여 스트레오 오디어 레벨 미터를 모델링하는지를 보여준다. 채널의 오디오 레벨이 0 이면, 해당 채널의 표시등이 켜지지 않는다. 오디오 레벨이 10이면, 해당 채널의 모든 표시등이 켜진다. 이 그림에서 왼쪽 채널의 현재 레벨은 9이고, 오른쪽 채널의 현재 레벨은 7이다.
The audio channels described above are represented by instances of the AudioChannel structure:
위에서 설명한 오디오 채널은 AudioChannel 구조체의 인스턴스로 표현된다.
struct AudioChannel {
    static let thresholdLevel = 10
    static var maxInputLevelForAllChannels = 0
    var currentLevel: Int = 0 {
        didSet {
            if currentLevel > AudioChannel.thresholdLevel {
                // cap the new audio level to the threshold level
                currentLevel = AudioChannel.thresholdLevel
            }
            if currentLevel > AudioChannel.maxInputLevelForAllChannels {
                // store this as the new overall maximum input level
                AudioChannel.maxInputLevelForAllChannels = currentLevel
            }
        }
    }
}
The AudioChannel structure defines two stored type properties to support its functionality. The
first, thresholdLevel, defines the maximum threshold value an audio level can take. This is a constant
value of 10 for all AudioChannel instances. If an audio signal comes in with a higher value than 10,
it will be capped to this threshold value (as described below).
AudioChannel 구조체는 이것의 기능을 지원하기 위해 두 저장 타입 프로퍼티를 정의한다. 첫번째 thresholdLevel, 오디오 레벨이 취할 수 있는 최대 임계값을 정의한다. 이는 모든 AudioChannel 인스턴스에 대한 상수값 10이다. 오디오 신호가 10보다 높은 값으로 수신되면, 이 임계값으로 제한된다.(아래 설명 참조)
The second type property is a variable stored property called maxInputLevelForAllChannels. This keeps
track of the maximum input value that has been received by any AudioChannel instance. It starts with
an initial value of 0.
두번째 타입 프로퍼티는 maxInputLevelForAllChannels라 불리는 변수 저장 프로퍼티다. 이것은 모든 AudioChannel 인스턴스에서 수신한 최대 입력값을 추적한다. 이것의 초기값은 0으로부터 시작한다.
The AudioChannel structure also defines a stored instance property called currentLevel, which
represents the channel’s current audio level on a scale of 0 to 10.
AudioChannel 구조체는 채널의 오디오 레벨을 현재 0에서 10까지 나타내는 currentLevel이라 불리는 저장 인스턴스 프로퍼티도 정의한다.
The currentLevel property has a didSet property observer to check the value of currentLevel whenever
it’s set. This observer performs two checks:
currentLevel 프로퍼티는 설정될 때마다 currentLevel값을 확인하는 didSet 프로퍼티 옵저버를 갖는다. 이 옵저버는 두 가지 검사를 수행한다.
- If the new value of currentLevel is greater than the allowed thresholdLevel, the property observer caps currentLevel to thresholdLevel.
- f the new value of currentLevel (after any capping) is higher than any value previously received by any AudioChannel instance, the property observer stores the new currentLevel value in the maxInputLevelForAllChannels type property.
- currentLevel의 새 값이 허용된 thresholdLevel보다 크면, 프로퍼티 옵저버는 currentLevel을 thresholdLevel로 제한한다.
- 제한된 후의 currentLevel의 새 값이 AudioChannel 인스턴스에서 이전에 수신한 값보다 크면 프로퍼티 옵저버는 maxInputLevelForALlChannels 타입 프로퍼티 안에 새 currentLevel 값을 저장한다.
In the first of these two checks, the didSet observer sets currentLevel to a different value.
This doesn’t, however, cause the observer to be called again.
두 검사 중 첫번째에서, didSet 옵저버는 currentLevel을 다른 값으로 설정한다. 그러나 이로 인해 옵저버는 다시 호출되지 않는다.
You can use the AudioChannel structure to create two new audio channels
called leftChannel and rightChannel, to represent the audio levels of a stereo sound system:
AudioChannel 구조체를 사용하여 leftChannel과 rightChannel이라 불리는 두개의 새로운 오디오 채널을 생성하여 스트레오 사운드 시스템의 오디오 레벨을 나타낼 수 있다.
var leftChannel = AudioChannel()
var rightChannel = AudioChannel()
If you set the currentLevel of the left channel to 7, you can see that
the maxInputLevelForAllChannels type property is updated to equal 7:
왼쪽 채널의 currentLevel을 7로 설정하면, maxInputLevelForAllChannels 타입 프로퍼티는 똑같이 7로 업데이트 되는 것을 확인할 수 있다.
leftChannel.currentLevel = 7
print(leftChannel.currentLevel)
// Prints "7"
print(AudioChannel.maxInputLevelForAllChannels)
// Prints "7"
If you try to set the currentLevel of the right channel to 11, you can see that the right
channel’s currentLevel property is capped to the maximum value of 10, and
the maxInputLevelForAllChannels type property is updated to equal 10:
오른쪽 채널의 currentLevel을 11로 설정하려 하면, 오른쪽 채널의 currentLevel 프로퍼티가 최대값인 10으로 제한된 것을 그리고 maxInputLevelForALlChannels 타입 프로퍼티가 똑같이 10으로 업데이트 된 것을 확인할 수 있다.
    rightChannel.currentLevel = 11
print(rightChannel.currentLevel)
// Prints "10"
print(AudioChannel.maxInputLevelForAllChannels)
// Prints "10"
맺음말
어후.. 길다.. 프로퍼티 래퍼에 대한 내용을 좀 더 살펴볼 필요가 있겠다.
@Published와 같이 자주 사용되기 때문.. 어떻게 해야 잘 쓸 수 있을지 모르겠다.. 새롭게 추가 된 매크로랑 어떤 관계인지?