CollectionView 그리기(2)
머리말
지난 번 글에서 UICollectionView 를 작성해보았다. 컬렉션 뷰를 작성하며, dataSource delegate를 활용한 코드
작성 시 작성해야 하는 코드 양이 많음을 알 수 있었다.
rxswift 를 사용한다면, 데이터 바인딩 시 dataSource 를 처리할 수 있다. 이를 활용하면 rxswift 방식의
일관적인 코드 작성 및 관리 포인트를 줄일 수 있다.
RxSwift를 적용해 DataSource 대체하기
// import RxSwift
import RxSwift
import RxCocoa

class ViewController: UIViewController {
    private var mainView: MyCollectionView {
        self.view as! MyCollectionView
    }

    // dataSource Observable 데이터 준비
    private var dataSource = BehaviorRelay(value: [
        Project(name: "안녕하세요"),
        Project(name: "여러분"),
        Project(name: "제"),
        Project(name: "가나다"),
        Project(name: "라마바사"),
        Project(name: "이리저리"),
        Project(name: "멤버십"),
    ])
    // cancelable 추가
    private var disposeBag = DisposeBag()

    override func viewDidLoad() {
        super.viewDidLoad()
        // Observable 데이터에 collectionView 바인딩
        dataSource.bind(to: mainView.collectionView.rx.items) { collectionView, row, project in
            let cell = collectionView.dequeueReusableCell(withReuseIdentifier: ProjectCell.reuseIdentifier, for: IndexPath(row: row, section: 0)) as! ProjectCell
            cell.configure(project: project)

            return cell
        }
        .disposed(by: disposeBag)

    }

    override func loadView() {
        view = MyCollectionView()
    }

    override func viewWillTransition(to size: CGSize, with coordinator: UIViewControllerTransitionCoordinator) {
        mainView.viewOrientationDidChange()
    }
}
먼저 컬렉션 뷰에 보여져야 할 데이터는 동일하게 준비해야 한다. 준비한 데이터는 BehaviorRelay를 사용했다.
이제 이 데이터에 collectionView의 items를 바인딩 한다. 바인딩 되는 부분을 살펴보면 기존
UICollectionViewDataSource 를 사용할 때 사용했던 cellForItemAt collectionView 메서드의 코드 내용이
들어오는 것을 확인할 수 있다.
viewDidLoad 에 바인딩 한 코드로 데이터와 컬렉션이 연결 되었다. 데이터 소스가 직접 바인딩 되었으므로,
기존에 델리게이트로 설정하던 코드는 필요 없어졌다. 날려주자.
class MyCollectionView: UIView {
    ...
    // 바인딩 할 데이터 ->  델리게이트로 바인딩 할 필요가 없어졌으므로 삭제
   // private var projects: [Project] = []
   ...

   init() {
    ...
    // collectionView 설정 -> dataSource가 직접 바인딩 되므로 델리게이트 전달을 위해 필요했던 self 할당 삭제
    // collectionView.dataSource = self
    collectionView.delegate = self
    ...
   }

    // 데이터 전달을 위한 메서드 -> 직접 바인딩 되므로 삭제
    // func configure(projects: [Project]) {
    //     self.projects = projects
    //     collectionView.reloadData()
    // }
}

// DataSource protocol 준수 불필요
extension MyCollectionView: UICollectionViewDelegateFlowLayout, UICollectionViewDataSource {
    // cell 갯수 설정 -> DataSource 불필요
    // func collectionView(_ collectionView: UICollectionView, numberOfItemsInSection section: Int) -> Int {
    //     return projects.count
    // }

    // cell 설정 -> DataSource 불필요
    // func collectionView(_ collectionView: UICollectionView, cellForItemAt indexPath: IndexPath) -> UICollectionViewCell {
    //     let cell = collectionView.dequeueReusableCell(withReuseIdentifier: ProjectCell.reuseIdentifier, for: indexPath) as! ProjectCell
    //     cell.configure(project: projects[indexPath.row])
    //     return cell
    // }

    // cell 사이즈 설정
    func collectionView(_ collectionView: UICollectionView, layout collectionViewLayout: UICollectionViewLayout, sizeForItemAt indexPath: IndexPath) -> CGSize {
        // cell에 직접 바인딩 되므로 불필요
        // cellTemplate.configure(project: projects[indexPath.row])
        return cellTemplate.sizeThatFits(CGSize(width: collectionView.bounds.width, height: .greatestFiniteMagnitude))
    }
}
이제 View 에서 DataSource를 날려주면 다음과 같이 남게 된다.
class MyCollectionView: UIView {
    let collectionView: UICollectionView
    private let flowLayout = UICollectionViewFlowLayout()
    // 레이아웃 설정을 위한 Cell 인스턴스
    private let cellTemplate = ProjectCell()

    init() {
        // collectionView 생성
        collectionView = UICollectionView(frame: .zero, collectionViewLayout: flowLayout)

        super.init(frame: .zero)

        // layout 설정
        flowLayout.minimumLineSpacing = 8
        flowLayout.minimumInteritemSpacing = 0

        // collectionView 설정
        collectionView.backgroundColor = .white
        collectionView.delegate = self
        collectionView.register(ProjectCell.self, forCellWithReuseIdentifier: ProjectCell.reuseIdentifier)

        // View에 추가
        addSubview(collectionView)
    }

    required init?(coder: NSCoder) {
        fatalError("init(coder:) has not been implemented")
    }

    // 레이아웃 변경 시 처리를 위한 메서드
    func viewOrientationDidChange() {
        flowLayout.invalidateLayout()
    }

    override func layoutSubviews() {
        super.layoutSubviews()
        collectionView.pin.vertically().horizontally(pin.safeArea)
    }
}

extension MyCollectionView: UICollectionViewDelegateFlowLayout {
    // cell 사이즈 설정
    func collectionView(_ collectionView: UICollectionView, layout collectionViewLayout: UICollectionViewLayout, sizeForItemAt indexPath: IndexPath) -> CGSize {
        return cellTemplate.sizeThatFits(CGSize(width: collectionView.bounds.width, height: .greatestFiniteMagnitude))
    }
}
흠. 큰 차이는 없지만, ViewController의 dataSource 의 값에 따라, 별 다른 설정 없이 collectionView의
items를 조정할 수 있다. dataSource를 별도의 클래스로 분리 시키면, 데이터만 관리하는 ViewModel로써
활용할 수 도 있음.
RxDataSources 사용하여 멀티 섹션 지원하기
section 이 하나만 이라면 위처럼 사용해도 되지만, 컬렉션 뷰의 섹션이 여러 개라면, RxDataSources 를
활용해보자.
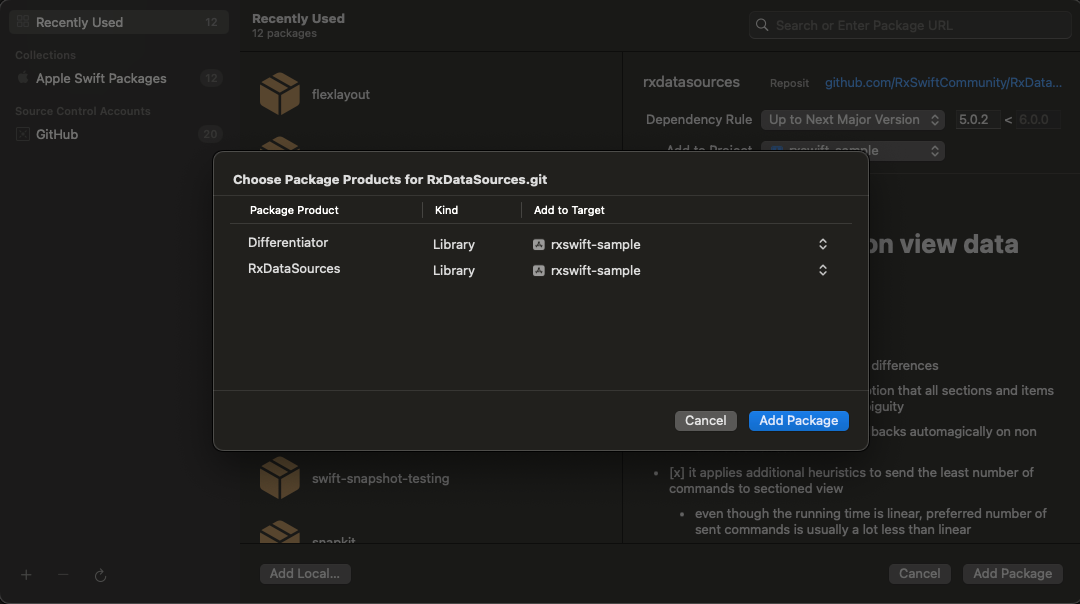
먼저 패키지를 추가한다. 패키지 추가 시 Differentiator 패키지도 사용할 수 있는데, 추가해주자. 얘를
사용하면, SectionModelType 생성 시 코드 작성을 편하게 도와준다.
// RXDataSources를 추가한다.
import RxDataSources

// SectionType을 정의한다.
typealias SectionOfProject = SectionModel<String, Project>
아래 두 코드는 동일하다.
typealias SectionOfProject = SectionModel<String, Project>
struct SectionOfProject {
    var header: String
    var items: [Item]
}

extension SectionOfProject: SectionModelType {
    typealias Item = Project
    init(original: SectionOfProject, items: [Project]) {
        self = original
        self.items = items
    }
}
class ViewController: UIViewController {
    // dataSource에 직접 바인딩 되던 데이터 분리
    private var projects = BehaviorRelay(value: [
            SectionOfProject(
                model: "TITLE",
                items: [
                    Project(name: "안녕하세요"),
                    Project(name: "여러분"),
                    Project(name: "제"),
                    Project(name: "가나다"),
                    Project(name: "라마바사"),
                    Project(name: "이리저리"),
                    Project(name: "멤버십")
                ]
            )
        ]
    )

    // datSource RxCollectionViewSectionedReloadDataSource로 변경
    private var dataSource: RxCollectionViewSectionedReloadDataSource<SectionOfProject>?

    override func viewDidLoad() {
        super.viewDidLoad()

        // Section기반 dataSource 생성하기
        dataSource = RxCollectionViewSectionedReloadDataSource<SectionOfProject>(configureCell: { _, collectionView, indexPath, project in
            let cell = collectionView.dequeueReusableCell(withReuseIdentifier: ProjectCell.reuseIdentifier, for: indexPath) as! ProjectCell
            cell.configure(project: project)

            return cell
        })

        // 바인딩하기
        guard let dataSource = dataSource else { return }
        projects
            .bind(to: mainView.collectionView.rx.items(dataSource: dataSource))
            .disposed(by: disposeBag)

    }

}
바인딩 시점에 cell을 설정하던 것을 dataSource 생성 시 설정하는 것으로 변경된 점을 빼면 큰 차이는 없다.
대신 dataSource를 사용하면 UICollectionReusableView를 사용해 collectionView의 header와 footer도 사용할
수 있다.
    dataSource = RxCollectionViewSectionedReloadDataSource<SectionOfProject>(configureCell: { _, collectionView, indexPath, project in
        let cell = collectionView.dequeueReusableCell(withReuseIdentifier: ProjectCell.reuseIdentifier, for: indexPath) as! ProjectCell
        cell.configure(project: project)

        return cell
        // header 설정 추가
    }, configureSupplementaryView: { dataSource, collectionView, title, indexPath in
        let header = collectionView.dequeueReusableSupplementaryView(ofKind: UICollectionView.elementKindSectionHeader, withReuseIdentifier: ProjectHeaderCell.identifier, for: indexPath) as! ProjectHeaderCell

        header.configure(title: dataSource.sectionModels[indexPath.section].model)

        return header
    })
class MyCollectionView: UIView {
    init() {
        ...
        collectionView.register(ProjectHeaderCell.self, forSupplementaryViewOfKind: UICollectionView.elementKindSectionHeader, withReuseIdentifier: ProjectHeaderCell.identifier)
    }
}

extension MyCollectionView: UICollectionViewDelegateFlowLayout {

    // cell 사이즈 설정
    func collectionView(_ collectionView: UICollectionView, layout collectionViewLayout: UICollectionViewLayout, sizeForItemAt indexPath: IndexPath) -> CGSize {
        return cellTemplate.sizeThatFits(CGSize(width: collectionView.bounds.width, height: .greatestFiniteMagnitude))
    }
    // header Layout 설정 추가
    func collectionView(_ collectionView: UICollectionView, layout collectionViewLayout: UICollectionViewLayout, referenceSizeForHeaderInSection section: Int) -> CGSize {
        return headerCellTemplate.sizeThatFits(CGSize(width: collectionView.bounds.width, height: .greatestFiniteMagnitude))
    }
}
ProjectHeaderCell 는 이렇게 작성되었다.
class ProjectHeaderCell: UICollectionReusableView {
    static let identifier = "ProjectHeaderCell"
    private var titleLabel = UILabel()

    override init(frame: CGRect) {
        super.init(frame: frame)
        titleLabel.text = "타이틀"
        titleLabel.textColor = .blue

        flex.define { flex in
            flex.addItem(titleLabel)
        }
        .paddingBottom(8)
    }

    required init?(coder: NSCoder) {
        fatalError("init(coder:) has not been implemented")
    }

    func configure(title: String) {
        titleLabel.text = title
        titleLabel.flex.markDirty()
        setNeedsLayout()
    }

    override func layoutSubviews() {
        super.layoutSubviews()
        layout()
    }

    override func sizeThatFits(_ size: CGSize) -> CGSize {
        pin.width(size.width)
        layout()
        return frame.size
    }

    private func layout() {
        flex.layout(mode: .adjustHeight)
    }
}
Resuable 패키지 사용해서 cell identifier 축약하기
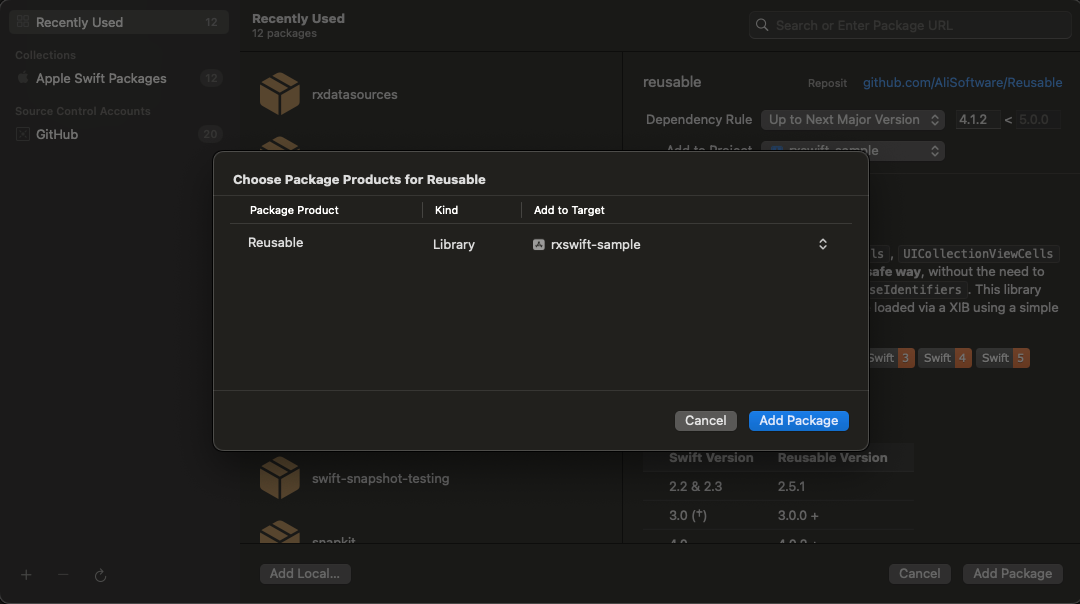
코드를 작성하다보면, Cell을 등록하고, dequeue 할 때 identifier가 길어짐을 느끼는데, swiftlint가 계속
잡아내기도하고, 코드가 길어져서 읽기도 불편하다. 이 때 Resuable 을 사용해보자.
// import
import Resuable

// 1. Resuable 프로토콜 준수
class ProjectCell: UICollectionViewCell, Resuable {
    // Reusable로 대체할 수 있다.
    // static let identifier = "ProjectCell"
}
class MyCollectionView: UIView {
    init() {
        ...
        // 2. register tl cellType으로 변경
        // collectionView.register(ProjectCell.self, forCellWithReuseIdentifier: ProjectCell.reuseIdentifier)
        collectionView.register(cellType: ProjectCell.self) // forCellWithReuseIdentifier를 줄였다..!
    }
}
class ViewController: UIViewController {
    ...
         override func viewDidLoad() {
            ...
                dataSource = RxCollectionViewSectionedReloadDataSource<SectionOfProject>(configureCell: { _, collectionView, indexPath, project in
                    // 3. cell dequeue 시 변경
                    // let cell = collectionView.dequeueReusableCell(withReuseIdentifier: ProjectCell.reuseIdentifier, for: indexPath) as! ProjectCell
                    let cell: ProjectCell = collectionView.dequeueReusableCell(for: indexPath) // 마찬가지
                    cell.configure(project: project)

                    return cell
                }, configureSupplementaryView: { dataSource, collectionView, title, indexPath in
                    let header = collectionView.dequeueReusableSupplementaryView(ofKind: UICollectionView.elementKindSectionHeader, withReuseIdentifier: ProjectHeaderCell.identifier, for: indexPath) as! ProjectHeaderCell

                    header.configure(title: dataSource.sectionModels[indexPath.section].model)

                    return header
                })
         }

}
Resuable 을 사용하니, 좀 더 가독성이 높아졌다. 큰 차이는 없을 수 있지만, lint가 시끄럽게 꽦꽦 거리는 걸
조금이라도 피할 수 있다는 점에서.. 사용을 추천하고 싶다.
맺음말
지금까지 collectionView 를 작성해보았다. 컬렉션 뷰 사용 시 위와 같은 패턴에 익숙해지면 편할 듯..?
prefetch와 같은 기능도 제공하고 있고, 컬렉션 뷰의 다양한 기능들을 위에 코드를 기본 베이스로
적용해봐야겠다. 아래는 위 코드들을 기준으로 작성한 뷰들.
참고 자료
- RxDataSources
- Reusable
- [iOS - swift] RxSwift, dataSource 처리 방법 (단일 Section, tableView, collectionView)
- RxDataSources CollectionView에 적용하기
프로젝트